Pinterest

Showing posts with label clothesline. Show all posts

February 3, 2013

one button tutorial part 7 finishing the bracelet

Finishing:

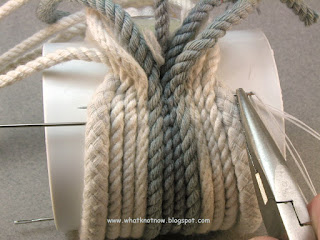
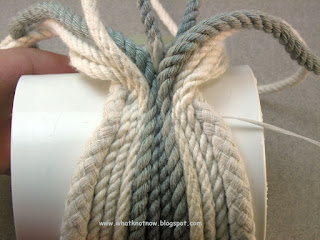
Here you can see the progress tensioning the cross-binding thread. Each side loop is tensioned in turn against the framing cord and cable tie.

In this picture you can see how to insert the crochet hook under the cable tie. As the nylon binding thread is drawn through the bracelet width will diminish as the infill cords are squeezed together.
 When you have tensioned the cross-binding thread all the way to the end use the extra thread to reverse-stitch back down the opposite direction. This adds some additional strength to the binding and enables you to smooth out any lumps that may have appeared.

Hint: You will want to use the small pliers as the cord fabric will be dense and hard to penetrate.
After you have buried most of the nylon thread use the diagonal cutters to snip off the remaining  nylon binding thread. The reverse stitching will lock the binding thread in place so there is no need for knots or tie offs.
Pop the bracelet off the mold and examine the interior. There should be no cross stitching visible! (practice makes this better)

The finished bracelet will shrink slightly from the mold size due to the compression of the cords during the binding process.

< back to part 6
< back to part 1
design and photographs © copyright 2013 WhatKnotShop

February 2, 2013

one button tutorial part 6 tensioning the cross bindings

 As you work around the mold you will notice that the amount of slack may vary in the center infill cords. To make the fabric come out even place the edge binding stitches but leave them loose with a small loop on each side as shown.

Use your thumb to keep the infill cords flat and even as you place the cross-binding stitches. You may need to crush some of the softer infill cords together to make them fit.
 Here the cross-binding of the infill cords has been completed with everything left in a slack condition.
 Place a nylon cable-tie in the small loops on each side as shown. They will be gradually withdrawn as the loops are tensioned.

The purpose of the cable ties is to hold the small thread loops open so they don't get buried in the framing cords during the tensioning process.

Use a crochet hook or other smooth object like a chop stick to grab the small loop closest to the compressed area. Stretch the nylon thread to compress the infill cords. Start with the first loop and pull firmly to the side.

As you pull on the thread loop the cable tie on the opposite side will hold the next loop away from the framework cord so you can grab it easily.

< back to part 5          forward to part 7 >
design and photographs © copyright 2013 WhatKnotShop

February 1, 2013

one button tutorial part 5 edge binding

Edge binding the infill cords:
Trim off the tails of the infill cords using a heavy scissor or wire cutters.


Hint: I prefer the diagonal wire cutters as these are heavy duty and can clip off multiple cords without fraying or distortion. Find these tools at a hardware store or borrow from your household tool kit.
 It's important to get a clean cut as close to the surface as possible.

Make another two or three crossings spaced about 1/8" apart. Draw the cords together and overstretch the nylon thread just slightly as you draw the thread through the cords.


Nylon is naturally elastic which means the thread will continue to compress the cords after you have placed the binding and drawn it through.


Continue edge-stitching back and forth using the nylon thread and pliers. Each infill cord should be anchored on each crossing. Tension each crossing   and work you way about half the circumference around the mold. Remove the temporary needles as you go.
Here you can see the progress of the edge binding. The heavier cord is positioned on each edge with the thinner cords in the center.

Hint: place an even tension on each crossing to maintain an even shape to the work. 

< back to part 4         forward to part 6 >

design and photographs © copyright 2013 WhatKnotShop

January 31, 2013

one button tutorial part 4 anchor the infill cords

Anchor the infill cords:
Work the infill cords into position as tightly as possible against the folded framing cord.

Place a needle as close as you can to hold everything parallel. Make sure the softer cords are not lost under the others.

Hint: line up the cords by pressing them into place against the mold with your thumb. Work the temporary holding needle through each cord.
Use the original needle and nylon thread to secure the infill cords. Carefully pass the needle through the edge of the framing cord and then the infill cords. Hold the needle at 90 degrees to intersect the cords. Draw the thread through carefully.

Check to be sure you have threaded all the cords together on the first pass. Try to thread through the center of each cord if possible. This will anchor the entire group of infill cords.
Another view of the all-important first pass of edge stitching. Reposition the infill cords as needed to anchor them securely.

Hint: A small pair of pliers is useful for handling the needles during the edge-stitching operation.


Pull on the nylon thread to squeeze the cords together as shown. Check to see that all the cords have been captured by the first two passes. If not...Remove the thread and try again!


< back to part 3             forward to part 5 >

design and photographs © copyright 2013 WhatKnotShop

January 30, 2013

one button tutorial part 3 placing infill cord

Placing the infill cords in the framing cord loop.

Have a look in your scrap bin and find some cord segments with a pleasing color range. We are using a mix of natural white and grey cotton cable cord for this example.

You can use just about anything you may have including fabric scraps, or other bits of stuff. You may also use beads and other objects but we won't cover that in this tutorial.
Spread the framing cords apart on the mold.  Double the infill cords and position the loops as shown on the mold. Cords should be relaxed and even. Each should be long enough to wrap completely around to the other end of framing cord.

Insert a long needle to hold the cord loops in place. Anchor the needle in the framework cord on either side.

You may add or subtract cord segments to get the pattern and color you need.
Roll the mold forward and lay out the cords evenly all the way around to the other end of the framing cords.

Keep the cords relaxed but even.

If you want to add small segments of accent color cords you may do so now. Anchor these with more temporary needles as required to hold them in place.

Place as many temporary needles as needed to position the infill cords and maintain an even tension. These will be removed as the bracelet is edge stitched together.

Hint: dont worry about the position of the temporary needles as long as they are placed perpendicular to the framing cords.

< back to part 2               forward to part 4 >
design and photographs © copyright 2013 WhatKnotShop

January 29, 2013

one button tutorial part 2 placing the button

Stitch across the folded cords several times. Keep the cord even and the stitching firm.

Lay out the loop you just created on the PVC mold to find out where the button needs to be located. Allow some slack (don't make it too snug).

Attach the button:

Pass the nylon thread up through the folded cord and place through the button holes, then back down through the fold.
Add 3-4 passes of thread to the button. Leave about 1/8" gap between the button and the folded cord to allow room for the loop to fit.


Pass the needle sideways through the folded cord on the last move so it near the inside end of the folded cords. Later you will use this to bind the infill cords using the edge-stitching technique.
Place the completed loop on the mold and position on the button as shown. The loop should fit loosely on the mold. The nylon thread should be near the top of the loop as shown.

Hint: It's a good idea to pre-measure the loop size before you place the button and make any adjustments before stitching the button in place.


< back to part 1        forward to part 3 >

design and photographs © copyright 2013 WhatKnotShop

January 28, 2013

one button tutorial part 1 framework loop and toggle 2626


 This tutorial shows how to make a simple one button rope bracelet out of clothesline and cotton cord.

The photo shows the completed bracelet with the heavier framing cords on the outside edge and the white and grey infill cord in the center.

This tutorial is presented in 7 parts, navigation buttons at the bottom of this page. To see pre-made bracelets similar to this design please visit my Etsy shop.


Materials needed: PVC pipe coupling (used as a mold), 16" of 3/8" clothesline cord, 48" nylon thread and needle, plastic button, a bundle of cotton cord (infill material)

Tools needed: small pliers, diagonal wire cutter, two nylon cable ties, crochet hook or chop stick.
Step one:
Create the framework cord and place the button:

Match the clothesline cord ends and place a few stitches across the cord to secure the ends. Keep the ends even as shown.
 Fold the cord back about 3/4" and bind with more cross stitching. Draw up the stitching to compress the cord ends together.


Hint: using a waxed thread makes it easy to tension the thread as the wax creates friction within the cord thus holding it in place.
Place 4 or 5 cross stitches in the folded cord and draw up securely.


                             part 2 >

design and photographs © copyright 2013 WhatKnotShop

February 26, 2012

clothesline loop bracelet 1781


Braided clothesline cord bleached and laminated into an oversize loopy cuff.


Big & easy to slip on 8 3/8" (212 mm) inside circumference.


Part of the design GEOmetry series.


design and photographs © copyright 2012 WhatKnotShop

January 12, 2012

clothesline cuff rope bracelet 1734


Slip on style bangle bracelet made with bleached cotton clothesline and four ply nylon thread.


Double layer of coiled rope creates a massive appearance but the bracelet is lightweight.


8 1/4" / 209 mm inside circumference

                     available here


wedge bangle                    GEOmetry collection

design and photographs © copyright 2012 WhatKnotShop

December 31, 2011

GEOmetry white wedge bangle 1682


braided cotton clothesline wrapped in a spiral pattern creating a stackable slip on bangle


size "large" (8 in/203 mm) inside (14 1/4 in/362 mm) outside


four ply nylon thread construction see more like this here or here


                     available here


design and photographs © copyright 2011 WhatKnotShop

November 24, 2011

1 button beaded cuff red and purple 1644

 This is a one button cuff made with braided cotton piping material and a mix of polyester and hand dyed cotton cord.

The size is a "medium" measuring about 7 1/2" (191 mm) inside circumference when closed.

Red, clear, and amber glass beads are worked into the seams between the cords around the edges.


 The toggle closure is a single plastic button and loop. The entire affair is constructed on an 8" plastic mold where the cords are laid out then edge bound together with four ply waxed nylon thread. When the cord fabric is stable the cuff is removed from the mold and the beads are worked into the seams.

This item is available here  and is part of a larger collection available at WhatKnotShop on Zibbet


Colors are off-white, rust, purple cords with red, clear, and amber glass beads, the button is a reddish brown.


design and photographs © copyright 2011 WhatKnotShop

November 5, 2011

2 button clothesline cuff with beads 1632

 Here is another of the clothesline cuff collection made with soft braided cotton clothesline, hand dyed cord scraps, wood and glass beads, and a couple of plastic buttons. The clothesline is laid out to form the loops and ridges then the smaller cord is bound in between. A row of lavender glass beads forms a seam in the center. The wood and glass beads are then worked into the seams on the ridges.

The whole process takes some time to complete and depends on the availability of cord scraps and beads.

This cuff measures 7 3/8" (183 mm) inside circumference when closed and is 2 3/8" (63 mm) wide.

You can find this bracelet on Zibbet along with a larger collection of the design )strata( series of fiber art bracelets.


design and photographs © copyright 2011 WhatKnotShop

November 2, 2011

white rope GEOmetry bangle 1640

White cotton clothesline cord is worked into a wedge shaped slip on bracelet. Simple form made from soft materials.


Binding is four ply nylon thread.
Slip on size is 7 1/2" (191 mm) inside circumference

                             available here.


double clothesline cuff      GEOmetry collection


design and photographs © copyright 2011 WhatKnotShop

October 31, 2011

white rope GEOmetry bracelets 1639, 1640, 1641, 1642

 New work with white braided clothesline. Two soft slip on style cuffs made in a cylindrical form and one wedge shaped slip on bangle. These came out soft and flexible. The bleached cord is a creamy white color.

White cotton soft bangle 1639 now listed on Etsy.
All three made from a soft all cotton braided clothesline cord. Binding is four ply nylon thread.

About 8 1/4" (208 mm) inside circumference, the wedge bangle was made on the same mold as the cuffs but shrinks as the outer strands are stitched down to about 7 1/2" (191 mm) inside circumference.
In this group there are two wedge bangles, the larger one is made from a different material which is grey color and has a plastic core.


The large wedge bangle is available in my Zibbet marketplace.


design and photographs © copyright 2011 WhatKnotShop

October 27, 2011

Three button beaded clothesline cuff bracelet 1633

 This is one is a series of button cuffs that start out with a length of braided cotton clothesline material. The loops and buttons are set up on the mold then the clothesline is doubled up to create a ridge on both edges and in the center. The colored strands of cord, in this design synthetic, are added and horizontally stitched to the clothesline edges. The two halves are then joined together with the tan colored pattern beads visible next to the center ridge in the top photo. By this time the cuff has taken on a rather stiff shape.
Rows of seed beads are worked into the seams between the clothesline cords on both edges. Two rows of round wooden beads are placed on the inside edges. Finally the ends of the four ply nylon thread are buried and it's finished.

Size is 7" (178 mm) inside circumference when closed. There is about 16 hours of work in this piece.

See this and other unique fiber art creations in the design section of my Etsy shop.
design and photographs © copyright 2011 WhatKnotShop