Pinterest

Showing posts with label one button toggle. Show all posts

June 30, 2013

1 button leather wrapped bracelet with black glass beads 2933

 This is the fourth in a series of small one button leather cord bracelets. Each has a unique detail that makes it special.

The basic design is four ply leather cord wrapped with a black waxed cotton thread. A 6 mm round wood bead and button connect with a pair of loops to form a secure easy to manage toggle.

This design features a pair of black glass crow beads placed opposite the button and loop.
 Size "small" about 7" (178 mm)

This design can be made both larger and smaller to fit children, women, and men.

All the components in this design are black: the button, the waxed cotton wrapping, and the beads.
Here are more designs you might like:
1 button bracelet with a pair of wooden beads
1 button bracelet with a polymer clay bead
1 button bracelet (plain - no beads)


           Available here.

design and photographs © copyright 2013 WhatKnotShop

June 29, 2013

1 button black leather wrapped bracelet 2932

  This is the third of a series of small one button leather cord bracelets. Each has a unique detail that makes it special.

The basic design is four ply leather cord wrapped with a black waxed cotton thread. A 6 mm round wood bead and button connect with a pair of loops to form a secure easy to manage toggle.

This design features a simple unadorned four ply cord without any beads.
  Size "small" about 7" (178 mm)

This design can be made both larger and smaller to fit children, women, and men.

This simple low profile shape has no added beads the focal point is the button and loop. Designed to layer with other bracelets or wear alone for a subtle touch of boho chic.
Here's a design with 2 small wood beads

Here's a design with a handmade pewter colored polymer clay bead

Here's the same design made with brown wrapped cord.

               Available here.


design and photographs © copyright 2013 WhatKnotShop

June 28, 2013

1 button black leather wrapped bracelet with poly clay bead 2931

This is the second in a series of small one button leather cord bracelets. Each has a unique detail that makes it special.

The basic design is four ply leather cord wrapped with a black waxed cotton thread. A 6 mm round wood bead and button connect with a pair of loops to form a secure easy to manage toggle.

This design features a handmade pewter colored poly clay bead placed opposite the button and loop.
 Size "small" about 7" (178 mm)

This design can be made both larger and smaller to fit children, women, and men.

The poly clay bead has an oversize hole to enable all four of the 2 mm leather cords to pass though. This is an example of the versatility of this design. Other custom made beads can be placed singly or in a group to add color and texture.
Here's a 1 button design with 2 small wood beads


1 button design plain (no extra beads)


              Available here

design and photographs © copyright 2013 WhatKnotShop

June 27, 2013

1 button wrapped leather cord bracelet wood beads 2930

 This is the first of a series of small one button leather cord bracelets. Each has a unique detail that makes it special.

The basic design is four ply leather cord wrapped with a black waxed cotton thread. A 6 mm round wood bead and button connect with a pair of loops to form a secure easy to manage toggle.

This design features two 3 mm wood beads placed opposite the button and loop.
 Size "small" about 7" (178 mm)

This design can be made both larger and smaller to fit children, women, and men.

Almost any type of bead detail can be added opposite the button and loop including custom made beads.
Here's a look at the group of bracelets. You can see the different details including:

four handmade paper beads
a grey poly clay bead
the basic design without any added beads

               Available here

design and photographs © copyright 2013 WhatKnotShop

May 3, 2013

dinosaur spiked bracelet 2793

This sculpy project involves creating beads that resemble the protruding plates of a stegosaurus and incorporating them into a one button design. This spiky bracelet is a companion piece to the Stegosaurus spiked rope bracelet.

The color is a light tan with grey orange and yellow cords. The framing cords are off-white. The button is also made with the tan clay.

Size is a "small" 7" (178 mm) inside circumference.


 The beads are made with two holes to enable a firm connection to the fabric. You can see these holes in the photo on the left.

The bracelet is constructed the same way as shown in this tutorial with the added beads.

Here's another design made with less aggressively shaped beads you might like.


or maybe this one would be interesting as well
See more of these playful designs in the fiber art section of my Etsy shop.


design and photographs © copyright 2013 WhatKnotShop

April 30, 2013

one button rope bracelet with polymer clay beads pewter 2764

 This one button design features handmade 10 mm round polymer clay beads placed in a field of blue green and grey cords. The oven bake clay is a "pewter" color which has a bit of a sheen to it.

Read the illustrated tutorial showing how to make these bracelets here.

The beads are secured with the edge binding thread.
 A small button and loop toggle holds the bracelet closed and is easy to manage.

Size is "small" 7" (178 mm) inside circumference when closed.

Here's a similar design you might like.

Here's one made with blue glass beads.

Here's a similar design made with wood beads.


                     Available here


See similar designs in the fiber art section of my Etsy shop.

design and photographs © copyright 2013 WhatKnotShop

April 2, 2013

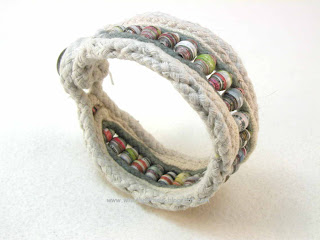
one button cuff with paper beads 2750

 Paper beads made from glossy catalog pages come up with the most interesting textures and colors. During the making of the beads they are all covered with the sealant/glue that creates the hard coating so it is not easy to see the color. When dry they begin to show.

These are roughly 6 mm oval beads worked into a simple one button design.
 The infill cords are ecru and dark grey setting off the eclectic color of the beads.


How-to tutorial here.

Another paper bead design you might like here.


A simple grey plastic button and loop form the closure.

This one is going in a special summer consignment at the Walker Art Center shop. If you are in Minneapolis between June and August stop by and check out this and other work by Minnesota Artists.

design and photographs © copyright 2013 WhatKnotShop

February 28, 2013

one button rope bracelet with wood barrel beads 2666

 The one-button design is as versatile as there are materials available...this one is made with 3/16" cotton braid for the framing cords, some bright white nylon braid, and two lengths of hand dyed tan cotton cord.


Tutorial "how-to" click here.


 The center is a row of variegated color but regular shaped wood beads obtained at the store. See the previous post for the latest on DIY paper beads used in these bracelet designs.

The white nylon highlights the warm color of the wood. The tan cords give this a nice earthy color.
Size is a "medium" about 7 1/2" (191 mm) inside circumference.

                         Available here


design and photographs © copyright 2013 WhatKnotShop

February 15, 2013

blue beaded one button bracelet 2653

 Mixed cotton and nylon cords set off the blue glass beads in this one button design. The framing cords are a 1/4" cotton braid creating a slightly thickened edge.


Size "small" 7" (178 mm) circumference.
 Blue glass beads catch the light.


To see a tutorial showing how to make this type of bracelet click here.

The loop and button detail.


  Available here


design and photographs © copyright 2013 WhatKnotShop

February 8, 2013

Green and white beaded cuff bracelet 2629

This is another in the series of one button rope bracelets made from up-cycled cord segments, a few beads and some cotton floss. The basic assembly is the same as this tutorial but with a few extra embellishments.

This design is a bit wider about 1 5/8" (42 mm) and has a double row of glass beads in the fabric. The edges are wrapped with cotton floss. The framing cord is made from cotton piping which is very soft and easily damaged.
 The floss is placed after the cords have been compressed so the shape and size is established.

The colors are muted sage and blue. Beads are green and blue. The white nylon cord is a recycled shopping bag handle.

More one button designs here:
Simple one button rope bracelet 2577
black and blue one button rope bracelet 2616
And a more over-the-top design here:
Grey and white two button beaded tribal cuff 

The floss is used here to reinforce and protect the button loop. Size is a large medium measuring 7 3/4" (196 mm). This was made on an 8" mold.

                  Available here

Visit the fiber art section of my Etsy shop to see more of these designs.

design and photographs © copyright 2013 WhatKnotShop

February 5, 2013

grey and white one button rope bracelet 2635

This one button bracelet was made from cotton cable cord and two segments of hand dyed grey braided clothesline cord. The construction technique is shown starting with part one of a seven part tutorial.

The heavier braided cord forms a small ridge detail in the center. The edge binding holds this bracelet together with the residual tension in the nylon thread.
 Here you can see the tiny dimples formed by the edge binding thread.

The framing cord in this design is a piece of cotton cable cord which is the same thickness as the infill cords so the result is a low profile edge condition.
 Here you can see the stirrup loop formed by the framing cord.

This is a size "medium" 7 3/4" (197 mm) inside circumference. This was made on an 8" mold and shrunk about 1/4" during the binding process.

                    Available here


design and photographs © copyright 2013 WhatKnotShop

February 3, 2013

one button tutorial part 7 finishing the bracelet

Finishing:

Here you can see the progress tensioning the cross-binding thread. Each side loop is tensioned in turn against the framing cord and cable tie.

In this picture you can see how to insert the crochet hook under the cable tie. As the nylon binding thread is drawn through the bracelet width will diminish as the infill cords are squeezed together.
 When you have tensioned the cross-binding thread all the way to the end use the extra thread to reverse-stitch back down the opposite direction. This adds some additional strength to the binding and enables you to smooth out any lumps that may have appeared.

Hint: You will want to use the small pliers as the cord fabric will be dense and hard to penetrate.
After you have buried most of the nylon thread use the diagonal cutters to snip off the remaining  nylon binding thread. The reverse stitching will lock the binding thread in place so there is no need for knots or tie offs.
Pop the bracelet off the mold and examine the interior. There should be no cross stitching visible! (practice makes this better)

The finished bracelet will shrink slightly from the mold size due to the compression of the cords during the binding process.

< back to part 6
< back to part 1
design and photographs © copyright 2013 WhatKnotShop

February 2, 2013

one button tutorial part 6 tensioning the cross bindings

 As you work around the mold you will notice that the amount of slack may vary in the center infill cords. To make the fabric come out even place the edge binding stitches but leave them loose with a small loop on each side as shown.

Use your thumb to keep the infill cords flat and even as you place the cross-binding stitches. You may need to crush some of the softer infill cords together to make them fit.
 Here the cross-binding of the infill cords has been completed with everything left in a slack condition.
 Place a nylon cable-tie in the small loops on each side as shown. They will be gradually withdrawn as the loops are tensioned.

The purpose of the cable ties is to hold the small thread loops open so they don't get buried in the framing cords during the tensioning process.

Use a crochet hook or other smooth object like a chop stick to grab the small loop closest to the compressed area. Stretch the nylon thread to compress the infill cords. Start with the first loop and pull firmly to the side.

As you pull on the thread loop the cable tie on the opposite side will hold the next loop away from the framework cord so you can grab it easily.

< back to part 5          forward to part 7 >
design and photographs © copyright 2013 WhatKnotShop

February 1, 2013

one button tutorial part 5 edge binding

Edge binding the infill cords:
Trim off the tails of the infill cords using a heavy scissor or wire cutters.


Hint: I prefer the diagonal wire cutters as these are heavy duty and can clip off multiple cords without fraying or distortion. Find these tools at a hardware store or borrow from your household tool kit.
 It's important to get a clean cut as close to the surface as possible.

Make another two or three crossings spaced about 1/8" apart. Draw the cords together and overstretch the nylon thread just slightly as you draw the thread through the cords.


Nylon is naturally elastic which means the thread will continue to compress the cords after you have placed the binding and drawn it through.


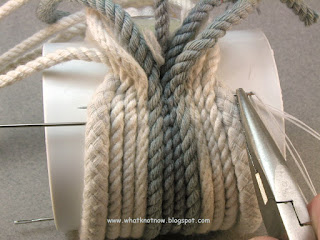
Continue edge-stitching back and forth using the nylon thread and pliers. Each infill cord should be anchored on each crossing. Tension each crossing   and work you way about half the circumference around the mold. Remove the temporary needles as you go.
Here you can see the progress of the edge binding. The heavier cord is positioned on each edge with the thinner cords in the center.

Hint: place an even tension on each crossing to maintain an even shape to the work. 

< back to part 4         forward to part 6 >

design and photographs © copyright 2013 WhatKnotShop

January 31, 2013

one button tutorial part 4 anchor the infill cords

Anchor the infill cords:
Work the infill cords into position as tightly as possible against the folded framing cord.

Place a needle as close as you can to hold everything parallel. Make sure the softer cords are not lost under the others.

Hint: line up the cords by pressing them into place against the mold with your thumb. Work the temporary holding needle through each cord.
Use the original needle and nylon thread to secure the infill cords. Carefully pass the needle through the edge of the framing cord and then the infill cords. Hold the needle at 90 degrees to intersect the cords. Draw the thread through carefully.

Check to be sure you have threaded all the cords together on the first pass. Try to thread through the center of each cord if possible. This will anchor the entire group of infill cords.
Another view of the all-important first pass of edge stitching. Reposition the infill cords as needed to anchor them securely.

Hint: A small pair of pliers is useful for handling the needles during the edge-stitching operation.


Pull on the nylon thread to squeeze the cords together as shown. Check to see that all the cords have been captured by the first two passes. If not...Remove the thread and try again!


< back to part 3             forward to part 5 >

design and photographs © copyright 2013 WhatKnotShop

January 30, 2013

one button tutorial part 3 placing infill cord

Placing the infill cords in the framing cord loop.

Have a look in your scrap bin and find some cord segments with a pleasing color range. We are using a mix of natural white and grey cotton cable cord for this example.

You can use just about anything you may have including fabric scraps, or other bits of stuff. You may also use beads and other objects but we won't cover that in this tutorial.
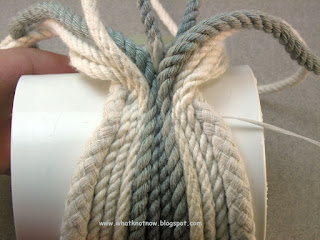
Spread the framing cords apart on the mold.  Double the infill cords and position the loops as shown on the mold. Cords should be relaxed and even. Each should be long enough to wrap completely around to the other end of framing cord.

Insert a long needle to hold the cord loops in place. Anchor the needle in the framework cord on either side.

You may add or subtract cord segments to get the pattern and color you need.
Roll the mold forward and lay out the cords evenly all the way around to the other end of the framing cords.

Keep the cords relaxed but even.

If you want to add small segments of accent color cords you may do so now. Anchor these with more temporary needles as required to hold them in place.

Place as many temporary needles as needed to position the infill cords and maintain an even tension. These will be removed as the bracelet is edge stitched together.

Hint: dont worry about the position of the temporary needles as long as they are placed perpendicular to the framing cords.

< back to part 2               forward to part 4 >
design and photographs © copyright 2013 WhatKnotShop