Pinterest

Showing posts with label ecru. Show all posts

April 20, 2015

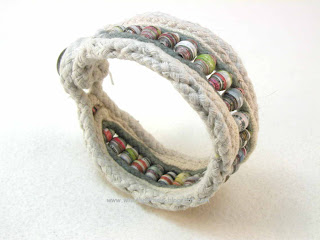
beaded soft bangle 3540

 Thin cotton rope molded and edge stitched with a row of glass seed beads
 The geometry:
17 beads
10 rows of cord
7" (178 mm)
2 1/4" (57mm)
1" (24 mm)
available here

These and other unique bracelets can be found online WhatKnotShop on ETSY


design and photographs © copyright 2015 WhatKnotShop

March 15, 2015

classic marsala ecru rope bracelet 3507

 Hand dyed marsala cotton cord centers two strands of natural white cotton in this medium wide rope bracelet. Classic plain-weave pattern knot design in five parts.
see more designs like this in the contrast+blend section of the Etsy shop


design and photographs © copyright 2015 WhatKnotShop

January 21, 2015

handmade rope double loop bracelets 3490

 These smaller double loop rope bracelets are made from lengths of hand twisted cord made on a table top rope machine. Six cotton yarns are stretched between the anchor point and the rotating mandrels then several hundred revolutions wind the pairs into three twisted strands. The natural tension in the twisted pairs winds the cord together into a single piece of cordage.
 The overlaps are secured with a waxed thread coach whipping then trimmed off.

Here's a handmade rope necklace of similar design or this handmade rope choker is also made on the machine.
This handmade rope wrap bracelet is made with thinner colored cord while this wrap bracelet is made with heavier yarn for a more substantial outcome.


Lightweight and small enough so they won't slide off a smaller hand, find these in the classic white section of the Etsy shop.

custom requests welcomed


design and photographs © copyright 2015 WhatKnotShop

January 25, 2014

basket weave bracelet olive taupe and ecru 3204

 The high contrast cord colors show off the distinctive spiral pattern created by the double over-under basket weave technique. Only two colors of cord are used leaving the third weave path unpopulated and opening up the texture of the fabric.


 This bracelet is narrower than many of the other examples posted at only 2 1/8 (52 mm) wide.

This is built on a 12 loop core of 3 mm soft cotton cord.
...sold but you can ask for a custom order


design and photographs © copyright 2014 WhatKnotShop

January 17, 2014

blue cotton two layer basket weave rope bracelet 3213

 More of the basket weave work this one with a two layer pattern. The single over-under weave is done in an extra soft #48 hand dyed cotton twist mixed colors of pastel blue and grey.

The over 4 - under 2 pattern is done in a light royal blue cord.

The over weave creates a strong horizontal (longitudinal?)  effect.
 Ecru weft cords help define the pattern with color contrast. There are four colors used in this design.


Smaller size 7 1/2" (191 mm) with a little bit of natural stretch, not a s much as the bias weave turks head knot bracelets.


             only one available here


design and photographs © copyright 2014 WhatKnotShop

April 2, 2013

one button cuff with paper beads 2750

 Paper beads made from glossy catalog pages come up with the most interesting textures and colors. During the making of the beads they are all covered with the sealant/glue that creates the hard coating so it is not easy to see the color. When dry they begin to show.

These are roughly 6 mm oval beads worked into a simple one button design.
 The infill cords are ecru and dark grey setting off the eclectic color of the beads.


How-to tutorial here.

Another paper bead design you might like here.


A simple grey plastic button and loop form the closure.

This one is going in a special summer consignment at the Walker Art Center shop. If you are in Minneapolis between June and August stop by and check out this and other work by Minnesota Artists.

design and photographs © copyright 2013 WhatKnotShop

February 16, 2013

overhand knot cotton cord bangle bracelet 2645


This is a new design that combines a simple overhand loop knot with edge binding technique to make a soft bangle style rope bracelet.

3/16" cotton line is wrapped around an 8" mold and a series of overhand knots are placed in the center.

Here you can see the two part braided pattern clearly.


The whole assembly is edge-bound together using  waxed nylon thread.


Here's another view of the braided pattern.

Size is 7 7/8" (200 mm) circumference.

                Available here


design and photographs © copyright 2013 WhatKnotShop

February 3, 2013

one button tutorial part 7 finishing the bracelet

Finishing:

Here you can see the progress tensioning the cross-binding thread. Each side loop is tensioned in turn against the framing cord and cable tie.

In this picture you can see how to insert the crochet hook under the cable tie. As the nylon binding thread is drawn through the bracelet width will diminish as the infill cords are squeezed together.
 When you have tensioned the cross-binding thread all the way to the end use the extra thread to reverse-stitch back down the opposite direction. This adds some additional strength to the binding and enables you to smooth out any lumps that may have appeared.

Hint: You will want to use the small pliers as the cord fabric will be dense and hard to penetrate.
After you have buried most of the nylon thread use the diagonal cutters to snip off the remaining  nylon binding thread. The reverse stitching will lock the binding thread in place so there is no need for knots or tie offs.
Pop the bracelet off the mold and examine the interior. There should be no cross stitching visible! (practice makes this better)

The finished bracelet will shrink slightly from the mold size due to the compression of the cords during the binding process.

< back to part 6
< back to part 1
design and photographs © copyright 2013 WhatKnotShop

February 2, 2013

one button tutorial part 6 tensioning the cross bindings

 As you work around the mold you will notice that the amount of slack may vary in the center infill cords. To make the fabric come out even place the edge binding stitches but leave them loose with a small loop on each side as shown.

Use your thumb to keep the infill cords flat and even as you place the cross-binding stitches. You may need to crush some of the softer infill cords together to make them fit.
 Here the cross-binding of the infill cords has been completed with everything left in a slack condition.
 Place a nylon cable-tie in the small loops on each side as shown. They will be gradually withdrawn as the loops are tensioned.

The purpose of the cable ties is to hold the small thread loops open so they don't get buried in the framing cords during the tensioning process.

Use a crochet hook or other smooth object like a chop stick to grab the small loop closest to the compressed area. Stretch the nylon thread to compress the infill cords. Start with the first loop and pull firmly to the side.

As you pull on the thread loop the cable tie on the opposite side will hold the next loop away from the framework cord so you can grab it easily.

< back to part 5          forward to part 7 >
design and photographs © copyright 2013 WhatKnotShop

February 1, 2013

one button tutorial part 5 edge binding

Edge binding the infill cords:
Trim off the tails of the infill cords using a heavy scissor or wire cutters.


Hint: I prefer the diagonal wire cutters as these are heavy duty and can clip off multiple cords without fraying or distortion. Find these tools at a hardware store or borrow from your household tool kit.
 It's important to get a clean cut as close to the surface as possible.

Make another two or three crossings spaced about 1/8" apart. Draw the cords together and overstretch the nylon thread just slightly as you draw the thread through the cords.


Nylon is naturally elastic which means the thread will continue to compress the cords after you have placed the binding and drawn it through.


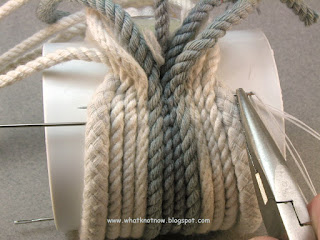
Continue edge-stitching back and forth using the nylon thread and pliers. Each infill cord should be anchored on each crossing. Tension each crossing   and work you way about half the circumference around the mold. Remove the temporary needles as you go.
Here you can see the progress of the edge binding. The heavier cord is positioned on each edge with the thinner cords in the center.

Hint: place an even tension on each crossing to maintain an even shape to the work. 

< back to part 4         forward to part 6 >

design and photographs © copyright 2013 WhatKnotShop

January 31, 2013

one button tutorial part 4 anchor the infill cords

Anchor the infill cords:
Work the infill cords into position as tightly as possible against the folded framing cord.

Place a needle as close as you can to hold everything parallel. Make sure the softer cords are not lost under the others.

Hint: line up the cords by pressing them into place against the mold with your thumb. Work the temporary holding needle through each cord.
Use the original needle and nylon thread to secure the infill cords. Carefully pass the needle through the edge of the framing cord and then the infill cords. Hold the needle at 90 degrees to intersect the cords. Draw the thread through carefully.

Check to be sure you have threaded all the cords together on the first pass. Try to thread through the center of each cord if possible. This will anchor the entire group of infill cords.
Another view of the all-important first pass of edge stitching. Reposition the infill cords as needed to anchor them securely.

Hint: A small pair of pliers is useful for handling the needles during the edge-stitching operation.


Pull on the nylon thread to squeeze the cords together as shown. Check to see that all the cords have been captured by the first two passes. If not...Remove the thread and try again!


< back to part 3             forward to part 5 >

design and photographs © copyright 2013 WhatKnotShop

January 30, 2013

one button tutorial part 3 placing infill cord

Placing the infill cords in the framing cord loop.

Have a look in your scrap bin and find some cord segments with a pleasing color range. We are using a mix of natural white and grey cotton cable cord for this example.

You can use just about anything you may have including fabric scraps, or other bits of stuff. You may also use beads and other objects but we won't cover that in this tutorial.
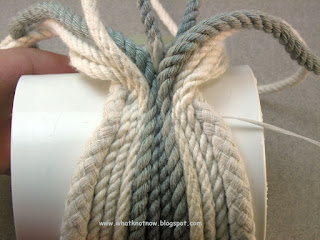
Spread the framing cords apart on the mold.  Double the infill cords and position the loops as shown on the mold. Cords should be relaxed and even. Each should be long enough to wrap completely around to the other end of framing cord.

Insert a long needle to hold the cord loops in place. Anchor the needle in the framework cord on either side.

You may add or subtract cord segments to get the pattern and color you need.
Roll the mold forward and lay out the cords evenly all the way around to the other end of the framing cords.

Keep the cords relaxed but even.

If you want to add small segments of accent color cords you may do so now. Anchor these with more temporary needles as required to hold them in place.

Place as many temporary needles as needed to position the infill cords and maintain an even tension. These will be removed as the bracelet is edge stitched together.

Hint: dont worry about the position of the temporary needles as long as they are placed perpendicular to the framing cords.

< back to part 2               forward to part 4 >
design and photographs © copyright 2013 WhatKnotShop

January 29, 2013

one button tutorial part 2 placing the button

Stitch across the folded cords several times. Keep the cord even and the stitching firm.

Lay out the loop you just created on the PVC mold to find out where the button needs to be located. Allow some slack (don't make it too snug).

Attach the button:

Pass the nylon thread up through the folded cord and place through the button holes, then back down through the fold.
Add 3-4 passes of thread to the button. Leave about 1/8" gap between the button and the folded cord to allow room for the loop to fit.


Pass the needle sideways through the folded cord on the last move so it near the inside end of the folded cords. Later you will use this to bind the infill cords using the edge-stitching technique.
Place the completed loop on the mold and position on the button as shown. The loop should fit loosely on the mold. The nylon thread should be near the top of the loop as shown.

Hint: It's a good idea to pre-measure the loop size before you place the button and make any adjustments before stitching the button in place.


< back to part 1        forward to part 3 >

design and photographs © copyright 2013 WhatKnotShop

January 28, 2013

one button tutorial part 1 framework loop and toggle 2626


 This tutorial shows how to make a simple one button rope bracelet out of clothesline and cotton cord.

The photo shows the completed bracelet with the heavier framing cords on the outside edge and the white and grey infill cord in the center.

This tutorial is presented in 7 parts, navigation buttons at the bottom of this page. To see pre-made bracelets similar to this design please visit my Etsy shop.


Materials needed: PVC pipe coupling (used as a mold), 16" of 3/8" clothesline cord, 48" nylon thread and needle, plastic button, a bundle of cotton cord (infill material)

Tools needed: small pliers, diagonal wire cutter, two nylon cable ties, crochet hook or chop stick.
Step one:
Create the framework cord and place the button:

Match the clothesline cord ends and place a few stitches across the cord to secure the ends. Keep the ends even as shown.
 Fold the cord back about 3/4" and bind with more cross stitching. Draw up the stitching to compress the cord ends together.


Hint: using a waxed thread makes it easy to tension the thread as the wax creates friction within the cord thus holding it in place.
Place 4 or 5 cross stitches in the folded cord and draw up securely.


                             part 2 >

design and photographs © copyright 2013 WhatKnotShop

July 28, 2012

Ella says...


Ella says: "I like these rope bracelets because they don't fall apart. I have some other ones that come undone but not these!"

In the active on-the-go world of a busy pre teen having a quality rope bracelet is important. The last thing you need is for it to come undone while swimming or hanging out with friends.

All WhatKnotShop rope bracelets are made with high quality materials. Each is worked up to a finished shape (except for the DIY kits) ready for the beach. The loose ends are carefully stitched up to prevent fraying and unraveling. This sturdy kid approved construction means that you can have a summer full of fun with your favorite rope bracelet and never worry  about it coming apart.

Here are three new handmade rope bracelets from the summer collection:
Three part teal blue made with smooth texture hand dyed cord.
Five part grey herringbone made with soft twisted cable cord.
Wider nine part ecru herringbone made with un-dyed cotton blend cable cord.

A closeup of the nine part herringbone bracelet showing the distinctive "v" patterns created by the double overlapping weave. The herringbone weave makes an extra stretchy bracelet that can expand to fit over a larger hand but will shrink down to a comfortable snug fit.

"I really like to wear my bracelets all the time, like even when I'm going skiing and I have to pull a sweater on over them."

Find a favorite for your summer...