Pinterest

Showing posts with label how to. Show all posts

November 7, 2016

geometry of PVC bracelets 4054

This post shows how to make different size bracelets from a single piece of PVC pipe.

The first picture shows an array of bracelets from the circular (upper left) to the oval (lower right). These shapes were sliced from the circular pipe at increasing angles.

This cutting generates a series of oval shaped sections that are then finished off with buffing to create a smooth surface.
 The 90 degree (or 0 deg angle)  cut produces a 2 1/8" (52 mm) diameter circular shape. About 6 3/16" (162 mm) circumference

A series of cuts at increasing angles produces ovals of increasing interior circumference
The 45 degree cut produces a 3" (76 mm) diameter oval shape (the short diameter is 2 1/8") and 7 3/4" (197 mm) interior circumference


design and photographs copyright 2016

December 3, 2014

turks head tutorials and DIY materials

Classic three part rope bracelet - There are any number of tutorials showing how to do this most basic design. Here are a few that I like:
Jan Brett's Sailor Bracelet site is a nice simple single page illustration of how to make a classic three part rope bracelet. 

Alan Folsom's page is another great source for instructions on tying turks heads. How to Tie a Turkshead will get you started. (click on the link then select from the list on the left side of the page)

This Panda Hall site is one of many that show the process using a satin cord to make a low profile three part bracelet:
How to Tie a Sailor Knot Friendship Bracelet with Only One Rope


If you need materials this kit will provide a 10 ft piece of cotton cord and my one-page published instruction sheet:
DIY rope bracelet kit


A slightly more complex four part turks head knot is shown in this illustrated tutorial:
11x4x3 turks head knot tutorial


For those of you advanced knotters this 13 part tutorial will challenge your hand-eye coordination:
building a 13 part turks head bracelet


If you are looking for a more unusual design try this herringbone weave tutorial:
Making a herringbone pattern bracelet


These bigger projects require more cord that the basic kits so you may want to order in bulk. This listing offers a choice of colors in longer lengths suitable for the 13 part and herringbone projects or as a way to economize for a knotting party.

bulk cotton cord

design and photographs © copyright 2014 WhatKnotShop


February 3, 2013

one button tutorial part 7 finishing the bracelet

Finishing:

Here you can see the progress tensioning the cross-binding thread. Each side loop is tensioned in turn against the framing cord and cable tie.

In this picture you can see how to insert the crochet hook under the cable tie. As the nylon binding thread is drawn through the bracelet width will diminish as the infill cords are squeezed together.
 When you have tensioned the cross-binding thread all the way to the end use the extra thread to reverse-stitch back down the opposite direction. This adds some additional strength to the binding and enables you to smooth out any lumps that may have appeared.

Hint: You will want to use the small pliers as the cord fabric will be dense and hard to penetrate.
After you have buried most of the nylon thread use the diagonal cutters to snip off the remaining  nylon binding thread. The reverse stitching will lock the binding thread in place so there is no need for knots or tie offs.
Pop the bracelet off the mold and examine the interior. There should be no cross stitching visible! (practice makes this better)

The finished bracelet will shrink slightly from the mold size due to the compression of the cords during the binding process.

< back to part 6
< back to part 1
design and photographs © copyright 2013 WhatKnotShop

February 2, 2013

one button tutorial part 6 tensioning the cross bindings

 As you work around the mold you will notice that the amount of slack may vary in the center infill cords. To make the fabric come out even place the edge binding stitches but leave them loose with a small loop on each side as shown.

Use your thumb to keep the infill cords flat and even as you place the cross-binding stitches. You may need to crush some of the softer infill cords together to make them fit.
 Here the cross-binding of the infill cords has been completed with everything left in a slack condition.
 Place a nylon cable-tie in the small loops on each side as shown. They will be gradually withdrawn as the loops are tensioned.

The purpose of the cable ties is to hold the small thread loops open so they don't get buried in the framing cords during the tensioning process.

Use a crochet hook or other smooth object like a chop stick to grab the small loop closest to the compressed area. Stretch the nylon thread to compress the infill cords. Start with the first loop and pull firmly to the side.

As you pull on the thread loop the cable tie on the opposite side will hold the next loop away from the framework cord so you can grab it easily.

< back to part 5          forward to part 7 >
design and photographs © copyright 2013 WhatKnotShop

February 1, 2013

one button tutorial part 5 edge binding

Edge binding the infill cords:
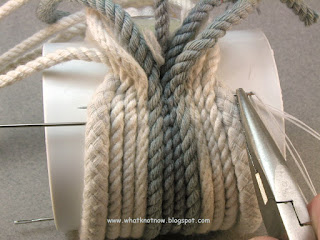
Trim off the tails of the infill cords using a heavy scissor or wire cutters.


Hint: I prefer the diagonal wire cutters as these are heavy duty and can clip off multiple cords without fraying or distortion. Find these tools at a hardware store or borrow from your household tool kit.
 It's important to get a clean cut as close to the surface as possible.

Make another two or three crossings spaced about 1/8" apart. Draw the cords together and overstretch the nylon thread just slightly as you draw the thread through the cords.


Nylon is naturally elastic which means the thread will continue to compress the cords after you have placed the binding and drawn it through.


Continue edge-stitching back and forth using the nylon thread and pliers. Each infill cord should be anchored on each crossing. Tension each crossing   and work you way about half the circumference around the mold. Remove the temporary needles as you go.
Here you can see the progress of the edge binding. The heavier cord is positioned on each edge with the thinner cords in the center.

Hint: place an even tension on each crossing to maintain an even shape to the work. 

< back to part 4         forward to part 6 >

design and photographs © copyright 2013 WhatKnotShop

January 31, 2013

one button tutorial part 4 anchor the infill cords

Anchor the infill cords:
Work the infill cords into position as tightly as possible against the folded framing cord.

Place a needle as close as you can to hold everything parallel. Make sure the softer cords are not lost under the others.

Hint: line up the cords by pressing them into place against the mold with your thumb. Work the temporary holding needle through each cord.
Use the original needle and nylon thread to secure the infill cords. Carefully pass the needle through the edge of the framing cord and then the infill cords. Hold the needle at 90 degrees to intersect the cords. Draw the thread through carefully.

Check to be sure you have threaded all the cords together on the first pass. Try to thread through the center of each cord if possible. This will anchor the entire group of infill cords.
Another view of the all-important first pass of edge stitching. Reposition the infill cords as needed to anchor them securely.

Hint: A small pair of pliers is useful for handling the needles during the edge-stitching operation.


Pull on the nylon thread to squeeze the cords together as shown. Check to see that all the cords have been captured by the first two passes. If not...Remove the thread and try again!


< back to part 3             forward to part 5 >

design and photographs © copyright 2013 WhatKnotShop

January 30, 2013

one button tutorial part 3 placing infill cord

Placing the infill cords in the framing cord loop.

Have a look in your scrap bin and find some cord segments with a pleasing color range. We are using a mix of natural white and grey cotton cable cord for this example.

You can use just about anything you may have including fabric scraps, or other bits of stuff. You may also use beads and other objects but we won't cover that in this tutorial.
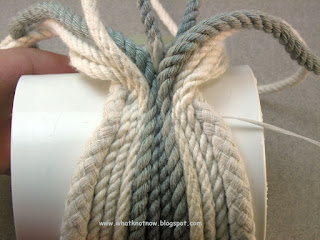
Spread the framing cords apart on the mold.  Double the infill cords and position the loops as shown on the mold. Cords should be relaxed and even. Each should be long enough to wrap completely around to the other end of framing cord.

Insert a long needle to hold the cord loops in place. Anchor the needle in the framework cord on either side.

You may add or subtract cord segments to get the pattern and color you need.
Roll the mold forward and lay out the cords evenly all the way around to the other end of the framing cords.

Keep the cords relaxed but even.

If you want to add small segments of accent color cords you may do so now. Anchor these with more temporary needles as required to hold them in place.

Place as many temporary needles as needed to position the infill cords and maintain an even tension. These will be removed as the bracelet is edge stitched together.

Hint: dont worry about the position of the temporary needles as long as they are placed perpendicular to the framing cords.

< back to part 2               forward to part 4 >
design and photographs © copyright 2013 WhatKnotShop

January 29, 2013

one button tutorial part 2 placing the button

Stitch across the folded cords several times. Keep the cord even and the stitching firm.

Lay out the loop you just created on the PVC mold to find out where the button needs to be located. Allow some slack (don't make it too snug).

Attach the button:

Pass the nylon thread up through the folded cord and place through the button holes, then back down through the fold.
Add 3-4 passes of thread to the button. Leave about 1/8" gap between the button and the folded cord to allow room for the loop to fit.


Pass the needle sideways through the folded cord on the last move so it near the inside end of the folded cords. Later you will use this to bind the infill cords using the edge-stitching technique.
Place the completed loop on the mold and position on the button as shown. The loop should fit loosely on the mold. The nylon thread should be near the top of the loop as shown.

Hint: It's a good idea to pre-measure the loop size before you place the button and make any adjustments before stitching the button in place.


< back to part 1        forward to part 3 >

design and photographs © copyright 2013 WhatKnotShop

January 28, 2013

one button tutorial part 1 framework loop and toggle 2626


 This tutorial shows how to make a simple one button rope bracelet out of clothesline and cotton cord.

The photo shows the completed bracelet with the heavier framing cords on the outside edge and the white and grey infill cord in the center.

This tutorial is presented in 7 parts, navigation buttons at the bottom of this page. To see pre-made bracelets similar to this design please visit my Etsy shop.


Materials needed: PVC pipe coupling (used as a mold), 16" of 3/8" clothesline cord, 48" nylon thread and needle, plastic button, a bundle of cotton cord (infill material)

Tools needed: small pliers, diagonal wire cutter, two nylon cable ties, crochet hook or chop stick.
Step one:
Create the framework cord and place the button:

Match the clothesline cord ends and place a few stitches across the cord to secure the ends. Keep the ends even as shown.
 Fold the cord back about 3/4" and bind with more cross stitching. Draw up the stitching to compress the cord ends together.


Hint: using a waxed thread makes it easy to tension the thread as the wax creates friction within the cord thus holding it in place.
Place 4 or 5 cross stitches in the folded cord and draw up securely.


                             part 2 >

design and photographs © copyright 2013 WhatKnotShop

January 19, 2013

Placing the center strand tutorial part 3

 Continue the placement of the center cord all the way to the end.

The end is the place where the two outer strands meet.

In this photo the fid is approaching the end of the white outer strand. Pull it through all the way and remove the fid.

 Flip the knot over 180 degrees and re-attach the fid to the other long loose end of the center cord.

Place the fid between the two outer strands and draw the cord through to the opposite side in exactly the same way as before. Keep the cord in the center, no twisting, relaxed tension...
 Here you can see the path of the cord across the the knot following the center gap. In the photo the loops have been left slack to illustrate the overlapping pattern.

Continue to place the cord until all the crossings are populated and the colored cord arrives at the end of the white outer strand.
Here the placement is complete and you can see the parallel layout of the cords marked in red. Hide the overlap underneath one of the parts. Keep the cords side-by-side to facilitate the stitching together of the strands.

To see how the ends are kept from fraying and falling apart check out the stitch up tutorial

< back to part 2

design and photographs © copyright 2013 WhatKnotShop

Placing the center strand tutorial part 2

 Follow the center channel around the knot using the fid to place the cord between the two outside cords.

Don't cross over any cords, keep the center cord in the center between the two outer strands at all times.
 Place the cord and pull through to the opposite side. Keep the center cord as straight as possible try not to let it get twisted during the draw-through.

Leave the center cord relaxed, that is don't make it tighter than the outer cords. The whole bracelet will naturally tighten up as the voids in the weave are filled with cord.
Continue following the outer strands around the knot. Place the center cord between the outer strands but leave it in a relaxed (not tight) condition.

Here the loop is shown slack for clarity.


< go back to part 1      go forward to part 3 >


design and photographs © copyright 2013 WhatKnotShop

Placing the center strand tutorial part 1

This tutorial shows how to place a contrasting center cord in a turks head knot. Here are things you will need:

48" of contrasting color cord

pre-made Turks Head Knot bracelet - this example is a 12 bight x 5 part x 2 strand knot left in a relaxed shape  - read about how to make a rope bracelet here

wood fid - custom made out of 3/8" dowel
(If you don't have a fid you can use a ball point pen with a bit of tape over the tip to prevent ink stains.)


 Place the fid on the end of the center cord.

Find the end of the turks head knot and count 2 1/2 times around the circumference to locate the center. (5 parts divided in half = 2 1/2)

How do you know how many parts your knot has? Read Decoding the Knot to find out

Insert the fid in the center of the knot as shown. Spread the outer strands using the fid to create a path for the center strand.
Draw the cord through the knot at the center point of the turks head knot until an equal amount of center cord is on both sides.


                                    go on to part 2 >

design and photographs © copyright 2013 WhatKnotShop

September 30, 2009

Part 7: Finished 5 part by 29 bight by 2 strand Herringbone weave bracelet


7.1 The finished bracelet worked up to an even tension.


7.2 The loose ends have been left in place.


7.3 Edge view shows the paired strands and the over two-under two pattern.


7.4 Ready to be stitched and trimmed.

pre-made herringbone rope bracelets are available in these online shops:
WhatKnotShop on Etsy
WhatKnotShop on Zibbet


start over