Pinterest

September 30, 2009

Part 7: Finished 5 part by 29 bight by 2 strand Herringbone weave bracelet


7.1 The finished bracelet worked up to an even tension.


7.2 The loose ends have been left in place.


7.3 Edge view shows the paired strands and the over two-under two pattern.


7.4 Ready to be stitched and trimmed.

pre-made herringbone rope bracelets are available in these online shops:
WhatKnotShop on Etsy
WhatKnotShop on Zibbet


start over

Part 6: Working up the complete knot


<--part 5
6.1 The knot has been removed from the tube and most of the big loops have been worked out. This process is the same as illustrated below. Keep the cords parallel and even as you work.

6.2 As you work up the knot keep an even tension on the cord.


6.3 Here the slack loop is on the right set up to pull through to the left side. A starter loop has been made with the fid.


6.4 The slack loop has been pulled most of the way through the knot to the left.


6.5 The loop is pulled through to the left and a starter loop has been made on the right.

pre-made herringbone rope bracelets are available in these online shops:
WhatKnotShop on Etsy
WhatKnotShop on Zibbet


6.6 The slack loop has been pulled most of the way through the knot to the left.

6.7 Work the loop from side-to-side around the knot. Each time take a small amount of extra slack out to the weave. The pull through loop will gradually enlarge as you work it around.

6.8 Since this is a 5 part knot there will be 5 trips around the circumference for to reach the end.
part 7 -->

start over

Part 5: Working to the ends of the cord


<--part 4
5.1 Follow the original lead around the tube until you run out of slack.

5.2 When that happens, reverse the tube placing the slack loops on your right. Begin from the point you stopped and remove the slack by pulling the loops through one at a time until you reach the end.

5.3 Continue following the original single lead keeping parallel and on the same side of the cord. Keep working back and forth round the knot until the two leads are overlapping each other.

pre-made herringbone rope bracelets are available in these online shops:
WhatKnotShop on Etsy
WhatKnotShop on Zibbet

part 6 -->

start over

Part 4: Following the first strand around Doubling the weave


4.1 Place the end of the running part UNDER the first TWO standing parts as shown.

4.2 Grab the loose end of cord from the very first loop and gently pull on it until the loop slips out from under the rubber band on the right side.


4.3 When you have taken in some slack it should look like this.


4.4 Keep the other loops securely placed under the rubber bands.


4.5 Follow the shortened loop with the running end. Stay parallel to the cord you are following.


4.6 Stay on the SAME SIDE of the cord you are following. Don't twist around or cross over the cord you are following.


4.7 Pull the slack through the knot carefully to avoid disrupting the layout.

4.8 Continue to work back and forth around the tube following the first lead. Every time you work to the right side, pull the loop from under the rubber band. Leave the slack loops on the left, we'll tighten them up later.


pre-made herringbone rope bracelets are available in these online shops:
WhatKnotShop on Etsy
WhatKnotShop on Zibbet


part 5-->

start over

Part 3: adding the fifth part


3.1 When you get back to the starting point place the running cord UNDER TWO and then OVER TWO as shown.

3.2 Then tuck the loop under the rubber band and reverse direction just as you have done before.


3.3 The photo shows the running loop as it reverses direction on top of the rubber band so you can see how it lays out.

As before, parallel and even is important.


3.4 Keep working around the tube using the UNDER TWO then OVER TWO placement pattern.


3.5 Continue back and forth until you reach the staring point once again.


3.6 Here the running part is coming OVER the two standing parts right below the starting point.

3.7 At this point there are FIVE passes around the tube with the over two-under two pattern established.

3.8 Make sure your loop ends are even and parallel before moving to the next steps.
part 4 -->

start over

Part 2: Adding parts to the knot

<--part 1                               
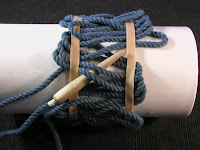
2.1 Continue placing cord parallel and next to the standing parts. Always CROSS OVER TWO of the standing parts at each side and remember to keep the loops even.

(This will make it easier to work up the knot later on)


2.2 Returning to the beginning again there will be THREE passes around the tube.

2.3 Place the cord UNDER ONE then OVER TWO as shown. Place the loop under the rubber band parallel to the other cords.

(This will be the pattern for the next pass around the tube)


2.4 Place the loop under the rubber bands and reverse direction just as before. Keep the cords even and parallel.

2.5 Work across to the opposite side of the tube as shown.


2.6 Continue to place the running part UNDER ONE and then OVER TWO as before. Tuck the loop under the rubber band and work the other direction until you return to start.


pre-made herringbone rope bracelets are available in these online shops:
WhatKnotShop on Etsy
WhatKnotShop on Zibbet


part 3-->

start over

Part 1: Making a herringbone knot bracelet


1.1 Start with 14 ft. of cord, a PVC or cardboard tube, and two rubber bands. Place the rubber bands about 1 1/2" inches apart and the end of the cord under the left band. Form a loop under the right band as shown.

1.2 Work back and forth between the rubber bands. Create six loops under each side.


1.3 When you get all the way around the tube, CROSS OVER the first lead as shown. Keep the loop under the rubber band to hold everything in place.

1.4 Keep working around the tube placing the cord parallel to and OVER the adjacent loops. Keeping the loops even will help you see the pattern.


1.5 Continue placing cord parallel as you work back and forth between the bands. Gently lift each rubber band to place the loop as shown.


1.6 When you get the starting point CROSS OVER TWO of the loops as shown. Place the cord under the band parallel to the standing parts.

1.7 Continue as before around he tube working back and forth keeping the cord parallel and even.


pre-made herringbone rope bracelets are available in these online shops:
WhatKnotShop on Etsy
WhatKnotShop on Zibbet


September 23, 2009

ragged fashion up-cycled cord soft bangle bracelet

Sometimes the most interesting developments spring from unlikely sources. So it is with this design series of cotton fiber bracelets which are made from cut off segments of hand dyed cord.

The piece shown to the left is a slip on bangle style cotton bracelet assembled from pieces of cord that have been bound together to create a pattern resembling geological strata (hence the name).


The colors are recombined in ways not possible with the highly structured weave of the turks head knots. The strands are arranged on a plastic mold and held in place temporarily with
sewing needles. The loop back patterns and interweaves are worked out and the needles are moved and repositioned until the final pattern is achieved.


At that point nylon thread is used to draw or compress the strands together with each lateral pass going through the cords from each side. Lock stitching is used to hold the thread in place. The ends are left frayed but are bound by the stitching.
check your slip-on size click here then select your favorite from one of these online shops:
WhatKnotShop on Etsy

WhatKnotShop on Zibbet


The design is copyright 2009 by WhatKnotShop

September 4, 2009

New color combinations for fall

Had a custom request for "Tangerine" colored bracelet so went into the kitchen and cooked up some new dye baths. Early results are shown to the left. The base color is a sand/tan that seems to work well with a number of reds and yellows.

Far left: Sand and sunshine yellow
Center: Sand and lighthouse red
Right: Sand and tangerine

Will be working on additional color combinations including grays, greens, and blues.
Direct your requests to the Etsy shop, link on left side of screen.