Pinterest

Showing posts with label green. Show all posts

April 20, 2015

beaded soft bangle 3540

 Thin cotton rope molded and edge stitched with a row of glass seed beads
 The geometry:
17 beads
10 rows of cord
7" (178 mm)
2 1/4" (57mm)
1" (24 mm)
available here

These and other unique bracelets can be found online WhatKnotShop on ETSY


design and photographs © copyright 2015 WhatKnotShop

June 7, 2014

bright blue and green rope bracelet 3332

Amping up the blue with this aquamarine and pairing with a real green takes this popular combination to a new level. Readers of this blog have seen variations of these colors in more subtle blends of teal and lighter less saturated blues paired with softer greens.

This one is brighter, I think it's the aquamarine… a liquid RIT dye color not available in the dry packets.
 Classic 17 part double diamond weave design made out of 3 mm cord.

See this and other blended color rope bracelets here.
8 1/4" (210) inside circumference


design and photographs © copyright 2014 WhatKnotShop

January 16, 2014

large anti-clastic cotton basket weave bangle 3214

 Right angle basket weave technique with a thick bundle of cords placed on the edges. The weft cords (back and forth pattern) wrap around forming a contrasting pattern calling attention to the reverse curve (anti-clastic) shape.


 Made with smooth braided hand dyed cotton cord - scraps from the boo-ya box.
Extra large size 8 1/2" (211 mm) lightweight


              available soon


design and photographs © copyright 2014 WhatKnotShop

January 13, 2014

basket weave rope bracelet 3206

 This simple plain-weave cuff is made with 3 mm cord. These pieces of cord are predominantly blue, purple and verdigris with a bright teal accent. The weft is black polyester.

The weave is drawn up to a firm but not tight tension which allows the loops of cord to show the alternating pattern.
 The cords are tied off with waxed thread then trimmed.
Soft and flexible about 8" inside circumference.


           available here


design and photographs © copyright 2014 WhatKnotShop

January 7, 2014

blue green double weave rope bracelet cuff 3200

Three mm white cotton cord is laid out on a mold then interwoven with three separate hand dyed colors.

The weave is a simple right angle pattern passing over two then under two. Each color is offset one step.

Cords are tensioned around the mold to an even but not tight shape.
 The offset of one step per color creates the subtle spiral pattern composed of the three color combination.
The white weft cords are gently drawn up to make the edges of the bracelet even. Loose ends are stitched with waxed nylon thread and trimmed off.


               available here


design and photographs © copyright 2014 WhatKnotShop

September 13, 2013

2 button organic industrial cuff bracelet 3038

 Summer is cooling off and a new batch of assembled designs is waiting in my basket to get published and uploaded to the fiber design section of my Etsy shop. This is an example of industrial organic a contradictory combination of rough beads dark colors and things that suggest a machine made origin.

The cuff is made with the edge stitching technique combining hand dyed cotton with bits of paracord to form a matrix that traps the nugget like beads.
 The closure is a double button and loop toggle that is offset creating a wrap-around effect.

The poly clay beads were made using a screen to produce a knurled texture making it appear that these are nuts or knobs re-purposed from some piece of machinery.
The colors are darker with black and various shade of green accented by blue and grey. The blue glass beads create a mysterious glow.

                       Available here


design and photographs © copyright 2013 WhatKnotShop

July 4, 2013

blue and green beaded turks head bracelet 2943

 An ordinary 12 x 5 x 3 turks head knot turns into something sparkly when the center strand is composed of 3 mm glass seed beads.

A two strand knot was tied using 3 mm teal blue cotton cord. The knot was left a little slack as the glass beads are non compressible and need plenty of space to pass through the weave.


 A 48" length of four ply nylon thread strung with the beads was threaded through the center and drawn up to a firm tension so there were no gaps in the bead string.

Here you can see the placement.

The bead string was secured at one end and the cotton cord was worked around to remove slack and even the tension. Then the other end of the bead string was used to stitch the loose ends together.


The results are pleasing with the blue green mix of beads and the blue cord.

These bracelets are heavier due to the glass beads

This is a size "small" to show the concept.

               available here

design and photographs © copyright 2013 WhatKnotShop

June 1, 2013

one button rope bracelet with paper beads 2765

 The irregular color and texture of handmade paper beads is a nice pairing with the textured fabric created by compressing the hand dyed cotton cords in this small bracelet. These are smaller 6-8 mm mostly round (remember I did say irregular?) made from glossy catalog pages and coated with a waterproof sealant.

If you have never seen paper beads before read more about how to make them here. Many of you already know about the possibilities which are vast!
 The button is a 1/2" (7 mm) brown plastic. The framing cords are a 9/16" cotton braid. Infill cords are hand dyed cotton in shades of slate blue, copper green and grey.

Read the illustrated tutorial showing the construction technique here.

See a similar one button design you might like here.

Or check out this paper bead bracelet design.
Size for this piece is "small" only 7" (178 mm) soon to be available online.

Similar designs can be found in the fiber art section f my Etsy shop.

            Available soon

design and photographs copyright 2013 WhatKnotShop

February 21, 2013

hardware cloth bracelet with beads 1478

 Conceptual bracelet made with green vinyl coated hardware cloth and red glass beads.


Slip-on bangle style design.

Garden chic, garage fashion, farady cage grunge.


 Glass beads have very small holes enabling the wire to be crimped over to hold them in place.

Could be made to size with 1/2" increments.
Size "medium" 7 5/8" (194 mm) no stretch to this one, it's made of coated steel.


design and photographs © copyright 2013 WhatKnotShop

February 8, 2013

Green and white beaded cuff bracelet 2629

This is another in the series of one button rope bracelets made from up-cycled cord segments, a few beads and some cotton floss. The basic assembly is the same as this tutorial but with a few extra embellishments.

This design is a bit wider about 1 5/8" (42 mm) and has a double row of glass beads in the fabric. The edges are wrapped with cotton floss. The framing cord is made from cotton piping which is very soft and easily damaged.
 The floss is placed after the cords have been compressed so the shape and size is established.

The colors are muted sage and blue. Beads are green and blue. The white nylon cord is a recycled shopping bag handle.

More one button designs here:
Simple one button rope bracelet 2577
black and blue one button rope bracelet 2616
And a more over-the-top design here:
Grey and white two button beaded tribal cuff 

The floss is used here to reinforce and protect the button loop. Size is a large medium measuring 7 3/4" (196 mm). This was made on an 8" mold.

                  Available here

Visit the fiber art section of my Etsy shop to see more of these designs.

design and photographs © copyright 2013 WhatKnotShop

February 3, 2013

one button tutorial part 7 finishing the bracelet

Finishing:

Here you can see the progress tensioning the cross-binding thread. Each side loop is tensioned in turn against the framing cord and cable tie.

In this picture you can see how to insert the crochet hook under the cable tie. As the nylon binding thread is drawn through the bracelet width will diminish as the infill cords are squeezed together.
 When you have tensioned the cross-binding thread all the way to the end use the extra thread to reverse-stitch back down the opposite direction. This adds some additional strength to the binding and enables you to smooth out any lumps that may have appeared.

Hint: You will want to use the small pliers as the cord fabric will be dense and hard to penetrate.
After you have buried most of the nylon thread use the diagonal cutters to snip off the remaining  nylon binding thread. The reverse stitching will lock the binding thread in place so there is no need for knots or tie offs.
Pop the bracelet off the mold and examine the interior. There should be no cross stitching visible! (practice makes this better)

The finished bracelet will shrink slightly from the mold size due to the compression of the cords during the binding process.

< back to part 6
< back to part 1
design and photographs © copyright 2013 WhatKnotShop

February 2, 2013

one button tutorial part 6 tensioning the cross bindings

 As you work around the mold you will notice that the amount of slack may vary in the center infill cords. To make the fabric come out even place the edge binding stitches but leave them loose with a small loop on each side as shown.

Use your thumb to keep the infill cords flat and even as you place the cross-binding stitches. You may need to crush some of the softer infill cords together to make them fit.
 Here the cross-binding of the infill cords has been completed with everything left in a slack condition.
 Place a nylon cable-tie in the small loops on each side as shown. They will be gradually withdrawn as the loops are tensioned.

The purpose of the cable ties is to hold the small thread loops open so they don't get buried in the framing cords during the tensioning process.

Use a crochet hook or other smooth object like a chop stick to grab the small loop closest to the compressed area. Stretch the nylon thread to compress the infill cords. Start with the first loop and pull firmly to the side.

As you pull on the thread loop the cable tie on the opposite side will hold the next loop away from the framework cord so you can grab it easily.

< back to part 5          forward to part 7 >
design and photographs © copyright 2013 WhatKnotShop

February 1, 2013

one button tutorial part 5 edge binding

Edge binding the infill cords:
Trim off the tails of the infill cords using a heavy scissor or wire cutters.


Hint: I prefer the diagonal wire cutters as these are heavy duty and can clip off multiple cords without fraying or distortion. Find these tools at a hardware store or borrow from your household tool kit.
 It's important to get a clean cut as close to the surface as possible.

Make another two or three crossings spaced about 1/8" apart. Draw the cords together and overstretch the nylon thread just slightly as you draw the thread through the cords.


Nylon is naturally elastic which means the thread will continue to compress the cords after you have placed the binding and drawn it through.


Continue edge-stitching back and forth using the nylon thread and pliers. Each infill cord should be anchored on each crossing. Tension each crossing   and work you way about half the circumference around the mold. Remove the temporary needles as you go.
Here you can see the progress of the edge binding. The heavier cord is positioned on each edge with the thinner cords in the center.

Hint: place an even tension on each crossing to maintain an even shape to the work. 

< back to part 4         forward to part 6 >

design and photographs © copyright 2013 WhatKnotShop

January 31, 2013

one button tutorial part 4 anchor the infill cords

Anchor the infill cords:
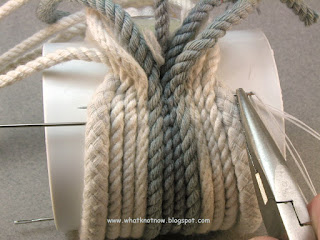
Work the infill cords into position as tightly as possible against the folded framing cord.

Place a needle as close as you can to hold everything parallel. Make sure the softer cords are not lost under the others.

Hint: line up the cords by pressing them into place against the mold with your thumb. Work the temporary holding needle through each cord.
Use the original needle and nylon thread to secure the infill cords. Carefully pass the needle through the edge of the framing cord and then the infill cords. Hold the needle at 90 degrees to intersect the cords. Draw the thread through carefully.

Check to be sure you have threaded all the cords together on the first pass. Try to thread through the center of each cord if possible. This will anchor the entire group of infill cords.
Another view of the all-important first pass of edge stitching. Reposition the infill cords as needed to anchor them securely.

Hint: A small pair of pliers is useful for handling the needles during the edge-stitching operation.


Pull on the nylon thread to squeeze the cords together as shown. Check to see that all the cords have been captured by the first two passes. If not...Remove the thread and try again!


< back to part 3             forward to part 5 >

design and photographs © copyright 2013 WhatKnotShop

January 30, 2013

one button tutorial part 3 placing infill cord

Placing the infill cords in the framing cord loop.

Have a look in your scrap bin and find some cord segments with a pleasing color range. We are using a mix of natural white and grey cotton cable cord for this example.

You can use just about anything you may have including fabric scraps, or other bits of stuff. You may also use beads and other objects but we won't cover that in this tutorial.
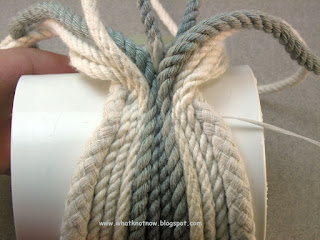
Spread the framing cords apart on the mold.  Double the infill cords and position the loops as shown on the mold. Cords should be relaxed and even. Each should be long enough to wrap completely around to the other end of framing cord.

Insert a long needle to hold the cord loops in place. Anchor the needle in the framework cord on either side.

You may add or subtract cord segments to get the pattern and color you need.
Roll the mold forward and lay out the cords evenly all the way around to the other end of the framing cords.

Keep the cords relaxed but even.

If you want to add small segments of accent color cords you may do so now. Anchor these with more temporary needles as required to hold them in place.

Place as many temporary needles as needed to position the infill cords and maintain an even tension. These will be removed as the bracelet is edge stitched together.

Hint: dont worry about the position of the temporary needles as long as they are placed perpendicular to the framing cords.

< back to part 2               forward to part 4 >
design and photographs © copyright 2013 WhatKnotShop