Pinterest

Showing posts with label knot bracelet. Show all posts

September 19, 2016

more two strand knotted rope bracelets 4006

 Second group of two strand designs also made from the ends of color runs and other materials I have hanging around the studio. All these are the medium weight cotton hand dyed using a water soluble system.

Check the ETSY shop to see what remains of this collection. These are limited edition bracelets. Sizes and colors will change with materials availability.


 Royal blue 6 1/4" (158 mm)
 Taupe 7" (178 mm)
 White (ecru) 6 1/2" (165 mm)
Canary 6 1/2" (165 mm)

Click here to see what's in-store!


design and photographs copyright 2016

September 15, 2016

child size rope bracelets 4009

 Kids love a day at the shore and what could make them happier than having a traditional rope bracelet? These are small scale bracelets made from thinner cotton that are just the right size for smaller children. The smaller cord creates a tighter braid pattern with some natural flexibility.

Sizes are about 6" (153 mm) circumference and can be special ordered in alternate sizes if desired.


Dark charcoal #24 cord to, 17 part design
Red #18 cotton, 17 part design

Additional colors are available, please visit the ETSY shop to see the selection.
Light purple #18 cotton, 17 part design


design and photographs copyright 2016

February 14, 2016

paper string bracelet 3831

 red paper string leftover from a holiday wrapping comes back in a small child size bracelet

The knots do not move so this is a fixed size


6 1/2" (165 mm)
 More designs like this:

blue double string bracelets

more elaborate string bracelet with beads 

tangled string bracelet in pink

two string loop bracelets in navy and bronze 

massive black string cuff 
These and other unique bracelets can be found online WhatKnotShop on ETSY


design and photographs copyright 2016

August 14, 2015

deep teal nylon cord knotted rope bracelet 3642

Most of the hand dyed cord I use is cotton but every now and then it's fun to see how well color takes to the synthetics. Some dyes are well suited like this darker teal which saturates the nylon braid quite nicely. The natural shiny finish on the nylon fibers add to the effect.

This is a 12x5x3 double diamond plain weave bracelet made with 1/8" (3 mm) cord. The dye is a  water-based RIT applied in a stovetop boil to a hank of the nylon.
 7" (178 mm) circumference

A blue-green synthetic same design

More smaller bracelets in the same weave design
Available here WhatKnotShop

These and other unique bracelets can be found online WhatKnotShop on ETSY


design and photographs © copyright 2015

June 7, 2014

bright blue and green rope bracelet 3332

Amping up the blue with this aquamarine and pairing with a real green takes this popular combination to a new level. Readers of this blog have seen variations of these colors in more subtle blends of teal and lighter less saturated blues paired with softer greens.

This one is brighter, I think it's the aquamarine… a liquid RIT dye color not available in the dry packets.
 Classic 17 part double diamond weave design made out of 3 mm cord.

See this and other blended color rope bracelets here.
8 1/4" (210) inside circumference


design and photographs © copyright 2014 WhatKnotShop

May 29, 2014

it's a family affair - matching rope bracelets for everyone

The only thing more fun than a day at the beach is having matching rope bracelets made for the crew. Here's a set custom made for a family headed out on vacation. Everyone wanted fog grey except for the youngest who requested a bright purple.

See the full lineup of available colors and make your special request here

Custom orders take a few days to produce and ship so order early! See you at the beach!
design and photographs © copyright 2014 WhatKnotShop

January 10, 2014

tan and sand double thickness basket weave rope bracelet cuff 3201

 This cuff turned out to be a bit larger measuring about 8" inside circumference but it seems much bigger due to the double weave construction. The opposing loops give this slip on bracelet a nice thickness. It's quite lightweight made from natural and hand dyed cotton cord.
 Here you can see the three colors in offset loops that set up the characteristic spiral pattern common to all the double weave designs. To get the spiral expressed all three of the offsetting loops must be placed or else the definition is lost.

The other innovation here is all the loose ends are turned 90 degrees and buried in the weave. Makes one of the overpassing loops a bit wider than the others but avoids all the tie-offs necessary when the loose ends are terminated at random points.
This one measures a full 2 5/8" (69 mm) wide so it really is a big wide cuff.


interested in this design? leave a comment please!


design and photographs © copyright 2014 WhatKnotShop

November 19, 2013

two of a kind matched pair wide rope bracelets 3144

on one hand:
warm olive taupe tan with a light sunshine yellow center
hand dyed cotton cable cord
five part double diamond weave design


                available here
 the pair

6" (153 mm) inside circumference
1 7/8" (47 mm) diameter

one to share
one to keep

similar design grey and teal here

green and white pair here
on the other hand:
light sunshine yellow with the warm olive taupe center


                available here


design and photographs © copyright 2013 WhatKnotShop

November 14, 2013

pick a pair of rope bracelets 3121

fog grey and cockatiel green
hand dyed cotton cable cord
size small
keep one give one
keep both
give both


                        available here


design and photographs © copyright 2013 WhatKnotShop

September 21, 2013

beaded turks head knot bracelet 3062

 Here's another beaded knot bracelet made with hand dyed cotton cord and seed beads.

The cord is a 3 mm smooth surface cotton that has been dyed a tan/taupe color. Read more about the small batch dye process here.

The beads are 8/0 Toho seed beads strung on 4 ply high strength nylon thread.
 The bracelet is constructed with the two outer strands. The beads are strung on the thread then interwoven into the two strand knot. Read more about Placing the center strand here.

I like the sympathetic color relationship between the beads and the cord color. This is a "small" size bracelet made to demonstrate the concept and color. Larger sizes can be made to order.

                  Available here

You might be interested in these other beaded turks head knots:

Blue and green beaded turks head bracelet

beaded white turks head knot bracelet

beaded turks head knot bracelet

design and photographs © copyright 2013 WhatKnotShop

January 26, 2013

stitch up tutorial part 3

Place a double overhand knot in the thread and cinch it up tight. This secures the cords so they don't come undone later.


 Trim off the excess thread using a heavy shear or wire cutter. Leave a 1/16" tail on the knot.

When you are finished the cords should be tightly bound together by the thread.
Trim off the cords using a wire cutter or scissor. Trim as close the weave as possible without damaging the other cords.


Here you can see the trimmed cord ends. The stitching is on the inside of the bracelet hidden from view. The cord ends will fray slightly causing them to be less noticeable.


After trimming the cords you may re-shape the bracelet by placing it over a bottle or other cylindrical object and evening the alignment of the cords.
Here's the finished product after having been shaped and stretched.


< back to part 2

design and photographs © copyright 2013 WhatKnotShop

January 24, 2013

stitch up tutorial part 2

  Make another pass with the needle and thread across the cords as shown. Space the stitching out so the cross threads cover the whole area of the parallel cords.
 Now there are three passes of thread securing the cords in place. Draw the thread through the cords and pull firmly to bind the cords together.
 Reverse the needle and place a fourth pass diagonally through the cords so the needle emerges near the origin point.

Pull firmly to tighten the thread.
This shows the stitching complete with the two pieces of thread drawn through the cords ready to tie off.


< back to part 1      forward to part 3 >

design and photographs © copyright 2013 WhatKnotShop

January 22, 2013

stitch up tutorial part 1

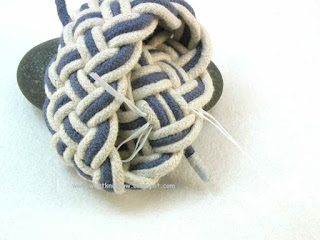
 In this tutorial the process of securing the loose ends of a multi-strand turks head knot will be demonstrated.

You will need a #6 needle with 18" of high strength thread. Carpet thread or other heavy duty material will work best.

This photo shows the completed knot turned partially inside out to expose the overlapping cords. Make sure the cords are arranged even and parallel as in the example.
 Using the sewing needle and high strength thread push the needle through the parallel strands of the knot cord at a 90 degree angle as shown.

You may find it helpful to use a pliers to handle the needle as the cord may be rather dense and resist the passage of the needle.
 Draw the thread through the cords leaving about 1" or so. This loose end will be used later to tie off the thread.

 Push the needle back through the strands  parallel to the first pass.
This photo shows the first two passes of the needle with the thread loop left slack for clarity.


                              go forward to part 2 > 

design and photographs © copyright 2013 WhatKnotShop

January 19, 2013

Placing the center strand tutorial part 3

 Continue the placement of the center cord all the way to the end.

The end is the place where the two outer strands meet.

In this photo the fid is approaching the end of the white outer strand. Pull it through all the way and remove the fid.

 Flip the knot over 180 degrees and re-attach the fid to the other long loose end of the center cord.

Place the fid between the two outer strands and draw the cord through to the opposite side in exactly the same way as before. Keep the cord in the center, no twisting, relaxed tension...
 Here you can see the path of the cord across the the knot following the center gap. In the photo the loops have been left slack to illustrate the overlapping pattern.

Continue to place the cord until all the crossings are populated and the colored cord arrives at the end of the white outer strand.
Here the placement is complete and you can see the parallel layout of the cords marked in red. Hide the overlap underneath one of the parts. Keep the cords side-by-side to facilitate the stitching together of the strands.

To see how the ends are kept from fraying and falling apart check out the stitch up tutorial

< back to part 2

design and photographs © copyright 2013 WhatKnotShop

Placing the center strand tutorial part 2

 Follow the center channel around the knot using the fid to place the cord between the two outside cords.

Don't cross over any cords, keep the center cord in the center between the two outer strands at all times.
 Place the cord and pull through to the opposite side. Keep the center cord as straight as possible try not to let it get twisted during the draw-through.

Leave the center cord relaxed, that is don't make it tighter than the outer cords. The whole bracelet will naturally tighten up as the voids in the weave are filled with cord.
Continue following the outer strands around the knot. Place the center cord between the outer strands but leave it in a relaxed (not tight) condition.

Here the loop is shown slack for clarity.


< go back to part 1      go forward to part 3 >


design and photographs © copyright 2013 WhatKnotShop

Placing the center strand tutorial part 1

This tutorial shows how to place a contrasting center cord in a turks head knot. Here are things you will need:

48" of contrasting color cord

pre-made Turks Head Knot bracelet - this example is a 12 bight x 5 part x 2 strand knot left in a relaxed shape  - read about how to make a rope bracelet here

wood fid - custom made out of 3/8" dowel
(If you don't have a fid you can use a ball point pen with a bit of tape over the tip to prevent ink stains.)


 Place the fid on the end of the center cord.

Find the end of the turks head knot and count 2 1/2 times around the circumference to locate the center. (5 parts divided in half = 2 1/2)

How do you know how many parts your knot has? Read Decoding the Knot to find out

Insert the fid in the center of the knot as shown. Spread the outer strands using the fid to create a path for the center strand.
Draw the cord through the knot at the center point of the turks head knot until an equal amount of center cord is on both sides.


                                    go on to part 2 >

design and photographs © copyright 2013 WhatKnotShop