Pinterest

Showing posts with label tapestry weave. Show all posts

March 14, 2017

Finishing the weave - String weave tapestry bracelet tutorial part 8

Part 8: Finishing the weave

When the gaps are full of cord use the tapestry needle to bury the end this time in the center of the weave.

Leave about 1" and draw the string carefully through the weave until the slack is gone.

Use enough force to firmly compact the weave but be careful not to distort the weave pattern.

Also trim off the exposed warp strands where they emerge from the weave. Don't accidentally cut the weft strands!
When the slack is removed trim off the extra piece with a scissor or cutting tool.

Here are some designs based on this technique you might like:

heather and blue grey one button string weave cuff

one button string weave leather lacing cuff white

heather grey one button cuff

wide blue tapestry woven rope cuff 


Here is the finished bracelet with the two colors of cotton weft completed.


Here's a view of the inside showing the button engaged in the end loops.


      2       3      4        5        6        7        8

design, photos, and descriptions copyright 2017

March 12, 2017

Adding a second color and finishing the weave - String weave tapestry bracelet tutorial part 7

 Part 7: Adding a second color and finishing the weave

In this example a second darker color weft string is used to add interest to the design. The weaving is the same technique as before using a new segment of cord. Start by burying the new weft in the existing work then continue weaving.

Cut a length of the weft string and double it on the tapestry needle as before.

Insert the needle under the the weave alongside the warp strand about 1" from the end and draw the new weft string through the weave.

Then resume the weaving from side to side observing the opposite over-under pattern as before keeping the weft strands  parallel at the turns without crossovers!

Continue the weave with the weft strands held parallel at the edges.

After each pass pack the weft cords down to eliminate gaps in the weave. Work from the turn edge across the weave towards the loose end allowing the weft to fill the gaps.

Pattern shift:

Here you will notice that those two loose ends of the warp strands have been grouped with the outside strands forming a new pattern:

over two - under one - over one - under two

leave the ends of the warp strands exposed, you will trim these off later.

At the button end continue weaving until the loops are stuffed with cord as shown. Use the tapestry needle to find the gaps and pack the weft firmly.

Fill the remaining gap at the button with the same figure-8 weave of the weft pair.


      2       3      4        5        6        7        8

design, photos, and descriptions copyright 2017

March 8, 2017

Securing the loop end weft - String weave tapestry bracelet tutorial part 6

 Part 6: Securing the loop end weft:

This is where the loop size is defined and the weft strings are secured.

Place the large tapestry needle over the loose ends at the loop end of the weave. You can draw some tension on the weave and tighten up the weft just a bit so it is even. Don't over tighten this part.

Leave the warp strand loops big enough for the button! Test this before finishing the weave.


Add one or two passes then bury the weft ends in the weave. Check the loop and button fit to ensure the loops are the correct size for easy fit over the button.

You can pack the weft down to enlarge the button loops.

For added security you may use a small needle and thread to secure the end of the weft strings by sewing a few stitches through the warp strands.
Here is the progress showing the weaving complete on the right side and the doubled over warp strands on the left.

Ready to begin the second color...


      2       3      4        5        6        7        8

design, photos, and descriptions copyright 2017

March 4, 2017

Terminating loose ends - String weave tapestry bracelet tutorial part 5

Part 5: Terminating loose ends

This part shows how to bury the ends of the weft strings in the completed weave.

These concealed terminations allow you to use varying lengths of weft strings of different colors maintaining the seamless appearance.

Wrap the pair around one of the outside warp strands and insert the tapestry needle under the loops as shown.

Draw the tapestry needle though several of the loops along side the warp cord allowing it to emerge about 1" from the start.

Note: you may remove the weaving from the loom to do this.

Gently draw the weft strings through the weave until the slack is removed. Don't distort the weave, just apply enough tension to snug the loop in place on the open end.
Then use a scissor or cutting tool to trim off the end avoiding damage to the weave.

Use this technique to establish a new warp pair: Run the needle the opposite direction with a fresh length of string. Re-start the weave following the established over-under order.


       2        3       4       5       6        7        8

design, photos, and descriptions copyright 2017

March 2, 2017

Beginning the weave - String weave tapestry bracelet tutorial part 4

Part 4: Beginning the weave

The pattern is a so called "plain weave" which is the simplest over one - under one sequence.

Take a length of the thin dyed weft string and double it through another tapestry needle. I use an oversize needle for ease of handling. You may also use a piece cardboard as a shuttle instead of the needle.

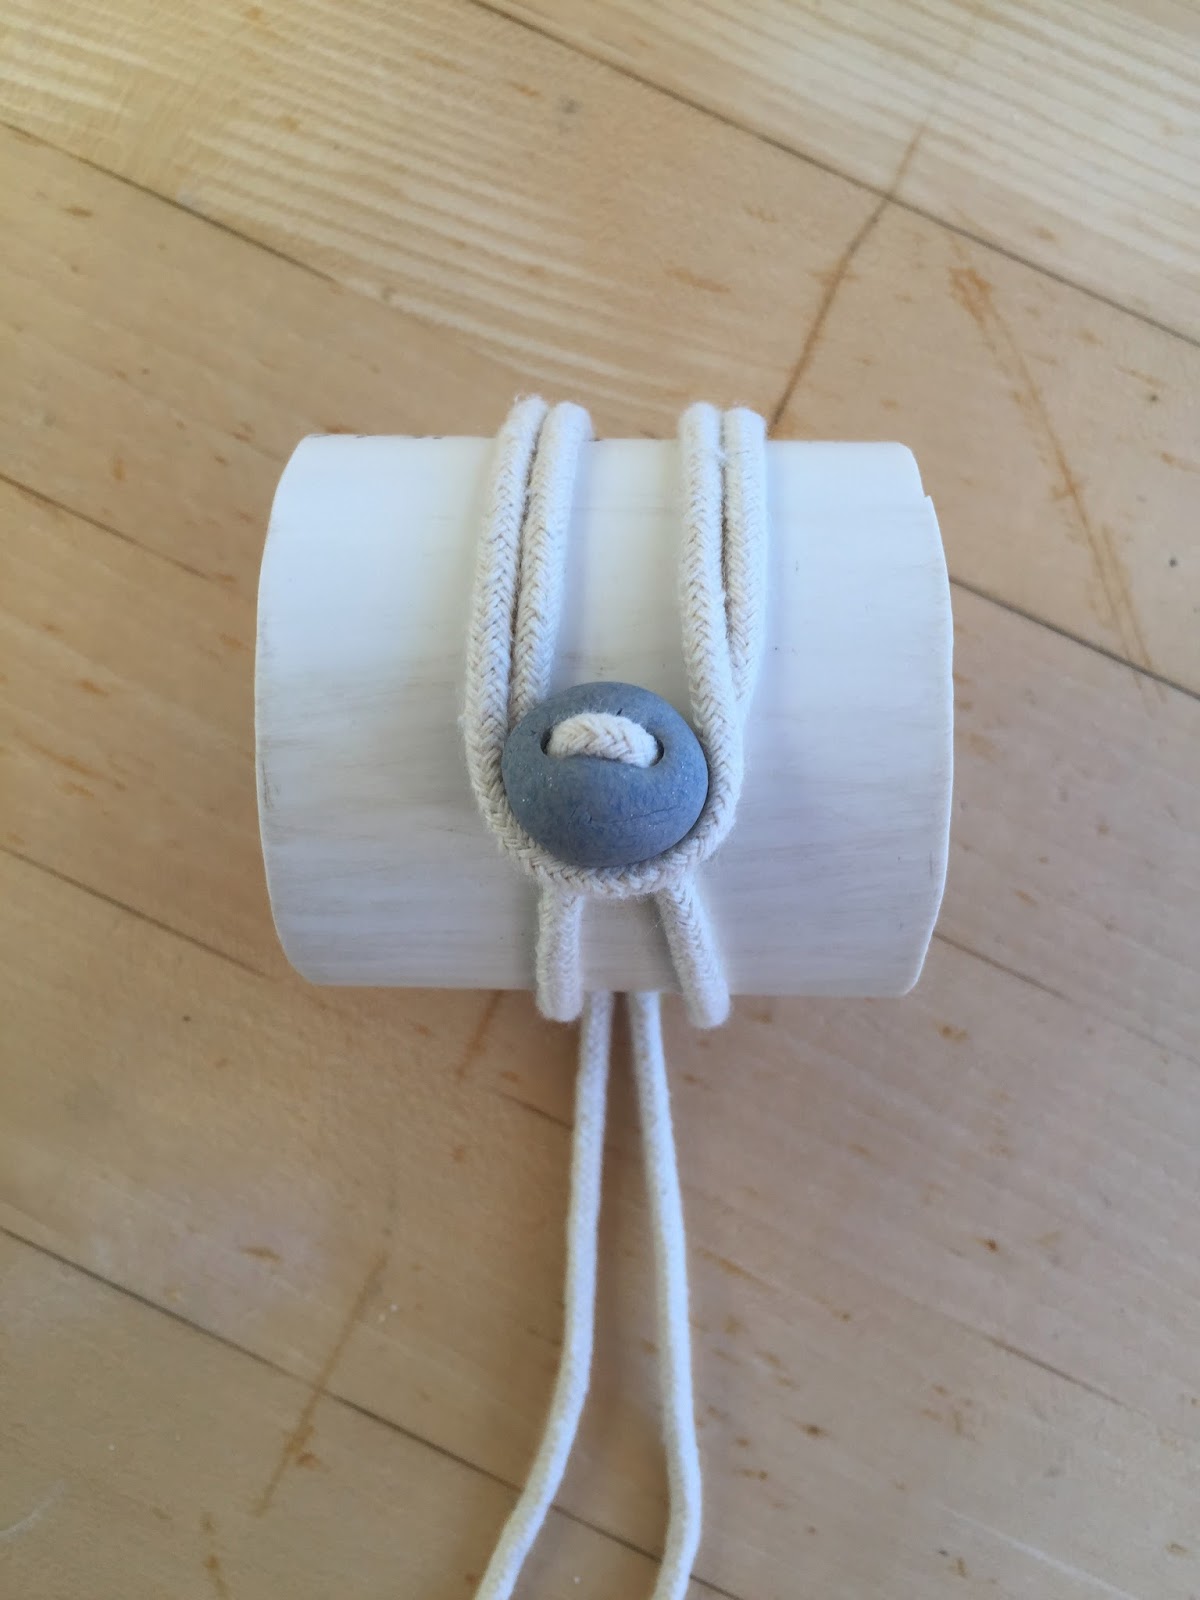
Start at the loop end of the warp cords. Leave 1/2" open loop to allow for the button.

Draw the doubled string through the warp cords with a simple over-under pattern. Use the needle to help separate the warp strands as you work back and forth.
Turn the doubled cords over "ribbon style" at the edge keeping them parallel. Don't allow the string to cross over when you make the turn.

(Can you see the bad crossover in this photo?)

Keeping the pair of string (weft) cords aligned will make the finished work look nice and neat.

Use the simple over-under pattern as before and pull the slack through the weave and pack the weft together.

Initially the weave may be somewhat loose and appear disorganized. Leave a 6" piece on the end, we will use this later to terminate the weave.


Continue to work the paired weft string ribbon-style back and forth through the thicker warp strands. This shows the correct alignment of the paired weft strings.

After each pass firm up the tension on the weft by gently pulling the loose end. The spacing will be as shown with the crossover between the warp strands slightly smaller than the diameter of the warp strands themselves.

You may use the pliers or the tapestry needle to compress or pack the weave after each pass.

Getting an even tension takes practice...

       2        3       4       5       6        7        8

design, photos, and descriptions copyright 2017

February 28, 2017

heather and blue grey one button string weave cuff 4122

 This is an example of the bracelet design that is covered by this tutorial: Part 1 click here

The core is grey cotton with a round "boulder button" made of polymer clay. The string is a lightweight twisted cotton tapestry woven onto the core strands.

All materials are hand dyed in a water based system, more about this process here and also here.
 Soft and flexible this is sized for an adult wrist measuring 8" (203 mm) circumference and about 1" wide.

The rounded button slips easily through  the loops but stays put when engaged.

Polymer clay is a great material for simple elements like buttons. It's easy to handle and quick to make up new buttons if you run out unexpectedly.


Here's the flat-out view as you would see the project on the loom but without the loom of course.

A few other projects you might like:
one button string weave leather lacing cuff white
heather grey one button cuff (similar colors)
collection of string weave bracelets 

More of these are available for you to purchase in the ETSY shop in the tapestry cuffs section

design and photographs copyright 2017

February 27, 2017

Setting up the loom - String weave tapestry bracelet tutorial part 3

Part 3: Setting up the loom

Here's where the warp cords are secured to the loom in preparation for the weaving process.

Unwrap the cord assembly from the tube mold and lay it out on the table. It should look something like this.

Your ends might be longer than the example, if so simply trim them off to the same approxomate length roughly 1 1/2" or so.
Here the warp assembly is placed on a simple loom. This loom is made of wood with pegs arranged on the working edges. This is a specialty tool you can make or buy.

On the loop end the both loops are placed over one of the pegs.

On the button end a spare length of cord is used to tension the assembly by looping around the button and one of the pegs. Secure with a square knot.

You can also use a couple of stout rubber bands instead of the knotted cord. This holds tension on the warp.

Note that the tapestry needle remains in place holding the warp strands secure near the button. If you accidentally dislodge it go back and set up the length on the mold.
Here's a closeup showing the button end. The tapestry needle holds the warp strands together. The button is tensioned using the knotted cord or rubber bands.

Practice is required to get the spacing and tension correct. Yes, it's a bit more involved...


1         2        3       4       5       6      7        8

design, photos, and descriptions copyright 2017

February 23, 2017

Setting up the warp cords for bracelet size, tapestry bracelet tutorial part 2

Part 2: Setting up the warp cords for bracelet size:

This project uses the 3 mm cotton cord as the framework (warp cords) for the bracelet. In order to predict the final size accurately circular mold made of PVC pipe is used.

Center the 36" cord and place the button. If you are using an ordinary button you may sew it in place the center of the cord. I use waxed nylon thread for all this sort of structural work, you may use carpet thread or any other heavy duty material.

For this project the clay button has been placed in the center of the loop of cord. The button is made with two holes allowing it to be placed on the cord without need for stitches.
Place the button on the mold corresponding to the finished size for the bracelet. In this example a 2" diameter pvc pipe is used to create a finished size of about 7 1/2" or about 191 mm circumference.

You may use a cardboard tube or a small jar to set the size you want. A cloth tape measure is useful to measure circumference of both wrist and mold.

Loop the two ends around the button as shown. (They go in opposite directions)

Bring the tails back in the center between the two strands.

You can hold the whole thing together with your hands after some practice.
Tuck each loose end into a reverse loop up under the button as snug as you can and use one of the tapestry needles to secure them both in place.

This may take a bit of practice.

Make the two reverse loops even as shown.

Allow the ends to lie parallel in the outside gaps as shown.

Adjust the tension so the side segments are even and snug to the mold.

1       2        3        4       5        6       7        8

design, photos, and descriptions copyright 2017

February 19, 2017

The cool product and caveats - String weave tapestry bracelet tutorial part 1

Part 1 The cool end product and a few caveats

This series shows how to make this taprestry weave bracelet from simple materials. This is a project for intermediate to advanced crafters who are familiar with some basic techniques including hand dying cotton string, setting up a simple loom, and a technique I call "needle weaving".

For this project a series of cotton cords are wrapped with lightweight dyed string to create a colorful flexible cuff bracelet. A special custom made clay bead is used to create a simple toggle closure.

Note that this project requires some custom materials and a small loom. These items are shown later on in the tutorial photos.


The wrapping string is ordinary cotton twine you can find at a local hardware store. It's a #24 so it is quite lightweight material similar to kite string.

The colors shown are made by dying the string in a water based dye bath. This is a special technique required to prepare the materials.

Read more about the dye process here.

Other materials you will need: a few tapestry or needle point needles. These are the blunt type with a large eye.

A small pair of pliers is useful when manipulating the work.

You will also need about 36" of 3 mm cotton cord and a button. The button used in this demonstration is a custom made clay button but you may use an ordinary plastic button instead.

You will also want to have on hand some rubber bands and other basic crafting tools. This tutorial covers the high level techniques which you can adapt to your own designs.

This is part 1 of a multi-part posting, more to come in the coming weeks.

1          2          3          4          5          6          7          8

design, photos, and descriptions copyright 2017


February 10, 2017

heather grey one button cuff 4095

A narrower four strand wrapped design made with two grey colors and an oversize button.

The edges are single cord wrapped with two cored paired in the center which creates the wider rib.

The needle-weaving is simple over-under plain weave using the interstitial space as the crossover. The wrapping string is paired. The ends of the core cords are looped back under the center rib.
 Here the four cords are visible as a pair of loops on the button.
Sized on a mold this design is 7" (178 mm) circumference.

Want to see how these are made?
View the step-by-step tutorial click here.


here are some other designs you might like:

wide blue tapestry woven rope cuff 4091

more string weaving bracelets 4096 4097 4099

experiments with string weaving overview


Warmer grey color with a cooler grey accent.


More of these are available for you to purchase in the ETSY shop in the tapestry cuffs section


design and photos copyright 2017