Pinterest

September 30, 2009

Part 4: Following the first strand around Doubling the weave


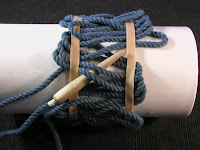
4.1 Place the end of the running part UNDER the first TWO standing parts as shown.

4.2 Grab the loose end of cord from the very first loop and gently pull on it until the loop slips out from under the rubber band on the right side.


4.3 When you have taken in some slack it should look like this.


4.4 Keep the other loops securely placed under the rubber bands.


4.5 Follow the shortened loop with the running end. Stay parallel to the cord you are following.


4.6 Stay on the SAME SIDE of the cord you are following. Don't twist around or cross over the cord you are following.


4.7 Pull the slack through the knot carefully to avoid disrupting the layout.

4.8 Continue to work back and forth around the tube following the first lead. Every time you work to the right side, pull the loop from under the rubber band. Leave the slack loops on the left, we'll tighten them up later.


pre-made herringbone rope bracelets are available in these online shops:
WhatKnotShop on Etsy
WhatKnotShop on Zibbet


part 5-->

start over

Part 3: adding the fifth part


3.1 When you get back to the starting point place the running cord UNDER TWO and then OVER TWO as shown.

3.2 Then tuck the loop under the rubber band and reverse direction just as you have done before.


3.3 The photo shows the running loop as it reverses direction on top of the rubber band so you can see how it lays out.

As before, parallel and even is important.


3.4 Keep working around the tube using the UNDER TWO then OVER TWO placement pattern.


3.5 Continue back and forth until you reach the staring point once again.


3.6 Here the running part is coming OVER the two standing parts right below the starting point.

3.7 At this point there are FIVE passes around the tube with the over two-under two pattern established.

3.8 Make sure your loop ends are even and parallel before moving to the next steps.
part 4 -->

start over

Part 2: Adding parts to the knot

<--part 1                               
2.1 Continue placing cord parallel and next to the standing parts. Always CROSS OVER TWO of the standing parts at each side and remember to keep the loops even.

(This will make it easier to work up the knot later on)


2.2 Returning to the beginning again there will be THREE passes around the tube.

2.3 Place the cord UNDER ONE then OVER TWO as shown. Place the loop under the rubber band parallel to the other cords.

(This will be the pattern for the next pass around the tube)


2.4 Place the loop under the rubber bands and reverse direction just as before. Keep the cords even and parallel.

2.5 Work across to the opposite side of the tube as shown.


2.6 Continue to place the running part UNDER ONE and then OVER TWO as before. Tuck the loop under the rubber band and work the other direction until you return to start.


pre-made herringbone rope bracelets are available in these online shops:
WhatKnotShop on Etsy
WhatKnotShop on Zibbet


part 3-->

start over

Part 1: Making a herringbone knot bracelet


1.1 Start with 14 ft. of cord, a PVC or cardboard tube, and two rubber bands. Place the rubber bands about 1 1/2" inches apart and the end of the cord under the left band. Form a loop under the right band as shown.

1.2 Work back and forth between the rubber bands. Create six loops under each side.


1.3 When you get all the way around the tube, CROSS OVER the first lead as shown. Keep the loop under the rubber band to hold everything in place.

1.4 Keep working around the tube placing the cord parallel to and OVER the adjacent loops. Keeping the loops even will help you see the pattern.


1.5 Continue placing cord parallel as you work back and forth between the bands. Gently lift each rubber band to place the loop as shown.


1.6 When you get the starting point CROSS OVER TWO of the loops as shown. Place the cord under the band parallel to the standing parts.

1.7 Continue as before around he tube working back and forth keeping the cord parallel and even.


pre-made herringbone rope bracelets are available in these online shops:
WhatKnotShop on Etsy
WhatKnotShop on Zibbet


September 23, 2009

ragged fashion up-cycled cord soft bangle bracelet

Sometimes the most interesting developments spring from unlikely sources. So it is with this design series of cotton fiber bracelets which are made from cut off segments of hand dyed cord.

The piece shown to the left is a slip on bangle style cotton bracelet assembled from pieces of cord that have been bound together to create a pattern resembling geological strata (hence the name).


The colors are recombined in ways not possible with the highly structured weave of the turks head knots. The strands are arranged on a plastic mold and held in place temporarily with
sewing needles. The loop back patterns and interweaves are worked out and the needles are moved and repositioned until the final pattern is achieved.


At that point nylon thread is used to draw or compress the strands together with each lateral pass going through the cords from each side. Lock stitching is used to hold the thread in place. The ends are left frayed but are bound by the stitching.
check your slip-on size click here then select your favorite from one of these online shops:
WhatKnotShop on Etsy

WhatKnotShop on Zibbet


The design is copyright 2009 by WhatKnotShop

September 4, 2009

New color combinations for fall

Had a custom request for "Tangerine" colored bracelet so went into the kitchen and cooked up some new dye baths. Early results are shown to the left. The base color is a sand/tan that seems to work well with a number of reds and yellows.

Far left: Sand and sunshine yellow
Center: Sand and lighthouse red
Right: Sand and tangerine

Will be working on additional color combinations including grays, greens, and blues.
Direct your requests to the Etsy shop, link on left side of screen.

August 27, 2009

Keeping them clean, advice on how to maintain rope bracelets


Some people like to put on rope bracelets and leave them in place for a extended period of time, sometimes years. They start off nice and clean but over time can get dirty especially with extended wear. Kids can sometimes leave a rope bracelet in place for months and this can present a challenge for parents who are trying to separate children from "dirt" especially if the kids have been fishing in lagoons, digging up shellfish, or building sand castles.

Bracelets made with cotton materials will naturally shrink when exposed to water. This shrinkage is partially reversible by stretching out the bracelet after it has dried. The shrinkage is what can make the bracelet fit better and become a fun semi-permanent accessory.

Bracelets made with nylon or other synthetic materials will not shrink as much as cotton but they can still get dirty with extended wear. If you have worked up your bracelet to a smaller size that you cannot easily remove you will want to wash it out from time to time.

Daily washing or even swimming in a pool can help keep your rope bracelet clean.

Here are some tips for keeping rope bracelets clean and odor free:

Wash with a mild soap when showering or bathing. Work the suds through the weave and make sure the underside is well lathered. Ordinary liquid hand soap is the best choice as it dissolves quickly and is easily rinsed out. For extra heavy soil using a fingernail brush to work the lather in to the fabric can be effective.

Dry with a clean towel or air dry.

For those of you who are able to remove your bracelets for washing you can use any type of laundry detergent or soap. The hand dyed colors may fade over time with repeated washings. Use cold water to wash rope bracelets unless you are tying to shrink them in which case very hot water can be used.

The natural cotton (un-dyed)  bracelets can be bleached with a very mild solution to brighten them up. Be sure to rinse thoroughly to remove traces of beach before putting them back on.

Naturally after a period of time you may want to start over with a clean fresh bracelet perhaps a different color or design. Visit

WhatKnotShop on Etsy to see a collection of currently popular designs

If you have a favorite design that needs replacing and want a replica made please be sure to place a custom order.

July 25, 2009

classic 3 part cotton turks head sailor bracelet

Here's a variation on the common three part design bracelet. In this child-size version the white cotton cord is separated by a strand of the teal blue.

Blue and white are a popular color combination.


This is a 14 bight design that was made to fill a special order. The strands are secured with nylon thread to prevent the whole thing from falling apart. Being cotton there will be some shrinkage.

Similar designs may be special ordered from the Etsy shop for larger or smaller hands. Other colors can also be ordered, check the previous blog posting for colors that are currently available.

simple classic designs

In an effort to come up with a simple "trademark" product I have been working on standardizing the design of a simple bracelet that is different from the commonly available products but that is easy to produce in both size and color.


The top photo is the prototype made in a white 3 mm cotton cord drawn up to finished shape. It's a herringbone weave of five parts that is doubled to form nice slip on style rope bracelet.


On the left are some of the basic colors:
A grey-green hand-dyed color
Another white one
A brown polyester blend
Another white one
And a black polyester blend


These four are more colorful, all in cotton hand-dyed colors:
Teal blue
Grey
Yellow
Red

All are 29 bight x 5 part x 2 strand THBs which are adult "medium" sizes. This style can also be made in a series of standard sizes from "extra small" to "extra large".

June 25, 2009

How to measure for size

The first step in measuring for a turks head bracelet is to determine the "slip-on" size. This is the minimum circumference that is needed to slip the bracelet on over your hand. Wrists are generally smaller than the hands so almost any bracelet that will slip on will also be a bit loose on your wrist.

This is done by squeezing your thumb and little finger together as shown on the left, then taking a measurement around the larger part of your hand.


Using a tape measure (or a piece of string) wrap the tape around the "fat" part of your hand. Usually this is the area between your thumb muscle and your knuckles.

If you use string, wrap the string around as shown then lay it flat and measure using a ruler or yardstick.

I have larger hands so this measurement for me is around 10". I can squeeze into a 8 3/8" circumference bracelet without injury.

Repeat this step several times until you have a consistent measurement. Use this measurement to check the inside circumference size posted on the listings.

Note that most of the turks head bracelets shown will have some give to them enabling them to stretch enough for you to squeeze through. The measurements posted are taken with the bracelets in a relaxed (un-stretched) condition.


cotton turks head bracelet 12 x 5 x 3


Here is a smaller 12 bight x 5 part x 3 strand bracelet made with 3 mm cord braided. This example has been worked up to a finished condition and measures 2" inside diameter roughly 6" inside circumference. The weave is about 1 1/8" wide.

This size would work well for a child or an adult with a smaller hand.


This design can also be left in a more relaxed condition which would enable placement over a larger hand.

The loose ends shown in the photos illustrate the fact that each of these bracelets is made with a single piece of cord.
check your slip-on size click here then select your favorite from one of these online shops:
WhatKnotShop on Etsy

WhatKnotShop on Zibbet


cotton cord materials used to make rope bracelets, a comparison

The photo on the left shows two traditional rope bracelets of the same design (14 bights x 3 parts x 3 strands) made from two different cotton cords:

The bracelet on the left is made from a 3 mm cotton cord which has a smooth micro-woven surface. The bracelet on the right is made from a #72 cotton cable cord which looks like a piece of rope with the three part twisted lay. (click on the image for a close up view)

The cable cord imparts a more traditional look to the bracelet. It actually is a smaller version of the larger ropes used on traditional sailing vessels and still in use today. The twisted three part construction adds another layer of "ropiness" to the look of the finished piece. Small imperfections in the string add to the authentic look of bracelets made with this material.


The smooth braided cotton cord has a cleaner look and works well in bracelets made with multiple parts and wider designs. The smoother surface makes the pattern of the bights and parts is easier to see in larger more complex patterns. The natural cotton color is an off-white or "ivory" color which is less bright than a white nylon.

Kits with instructions as well as bulk cord is available in a variety of colors including the traditional white shown here. Please visit one of the on-line shops to see both materials and finished bracelets: